Knitting and Crocheting my own Duke Sucellus slippers
2025-03-02 13:05
I thought I’d start off easy with my first post, and share a pair of slippers I made based off an item in (old school) runescape. I took a lot of notes since I had to do everything twice to make a pair of slippers, so here is my pattern write-up.
I realize this is a really niche topic, this pattern requires you to:
- know how to knit
- know how to crochet
- like Old School Runescape
but I wanted to explore my thought process & how the project went, which I think can be universally applicable to a lot of different fibre craft backgrounds.
Inspiration
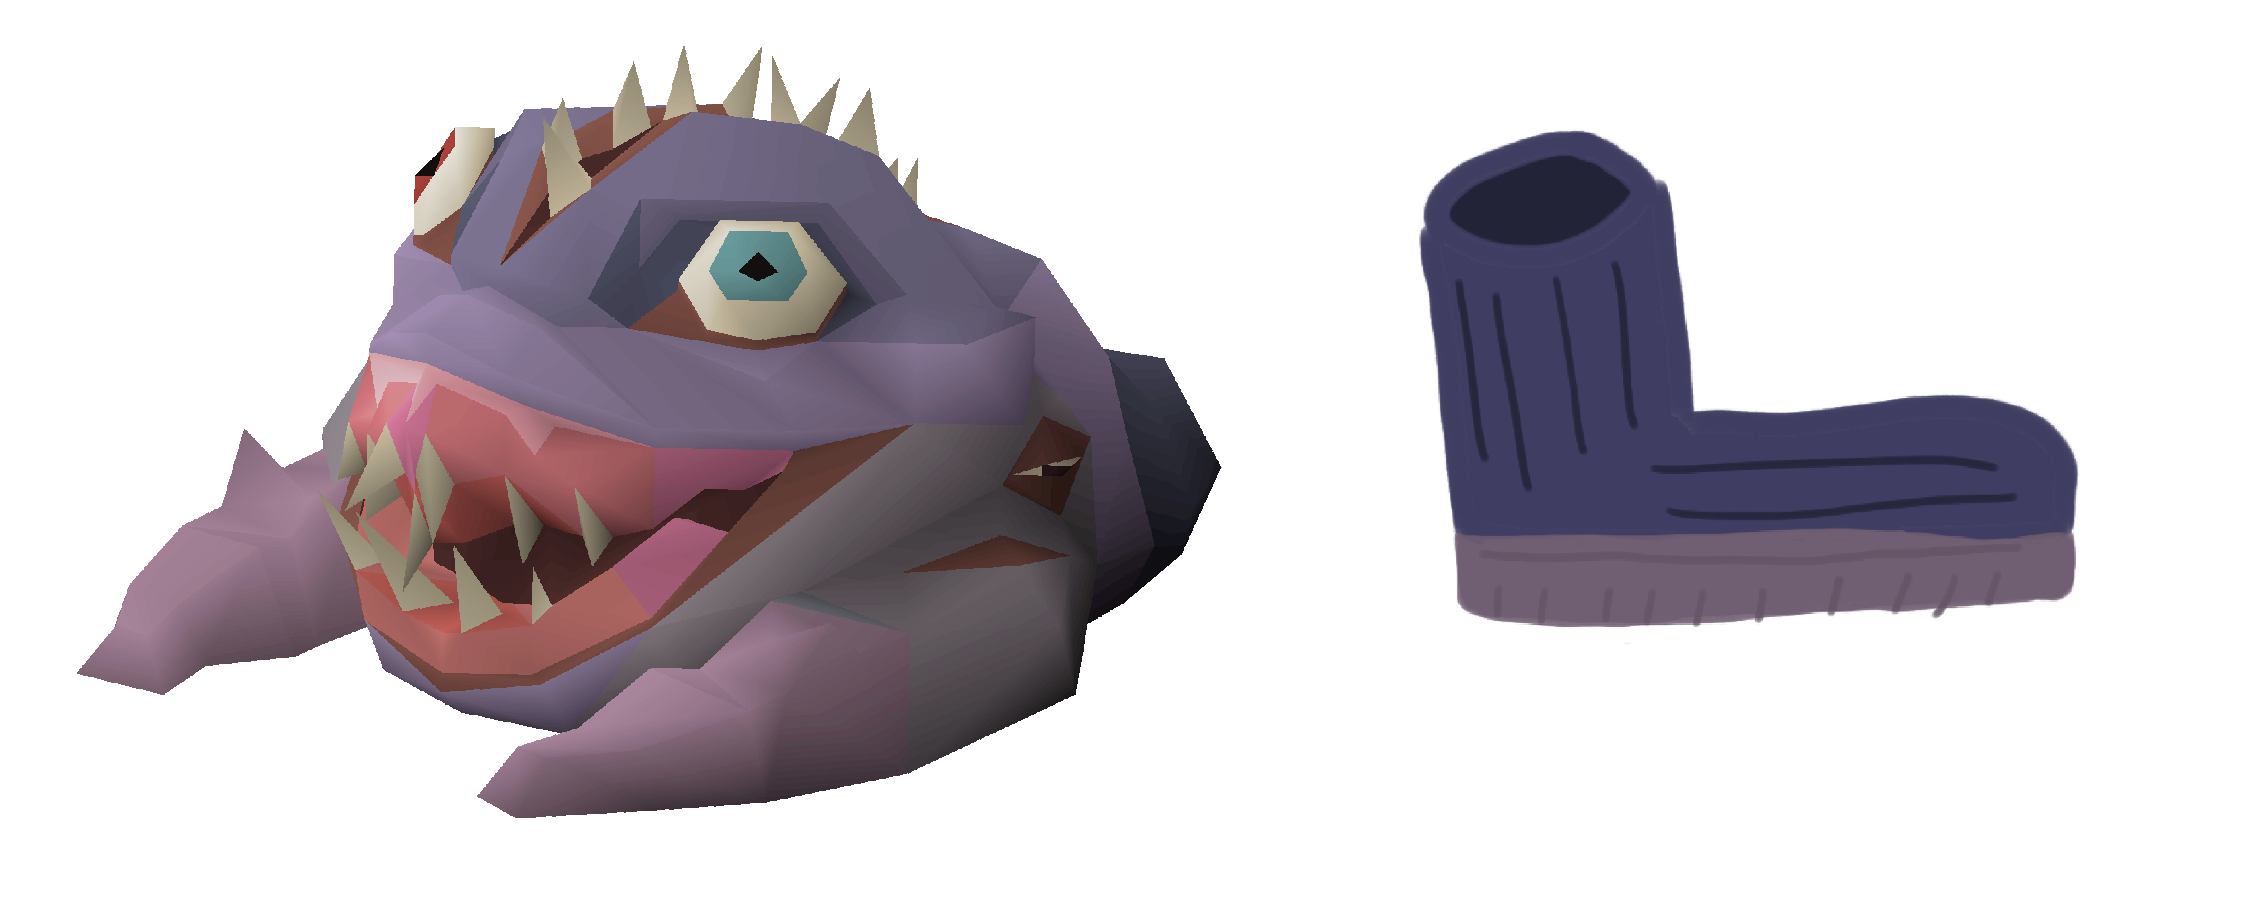
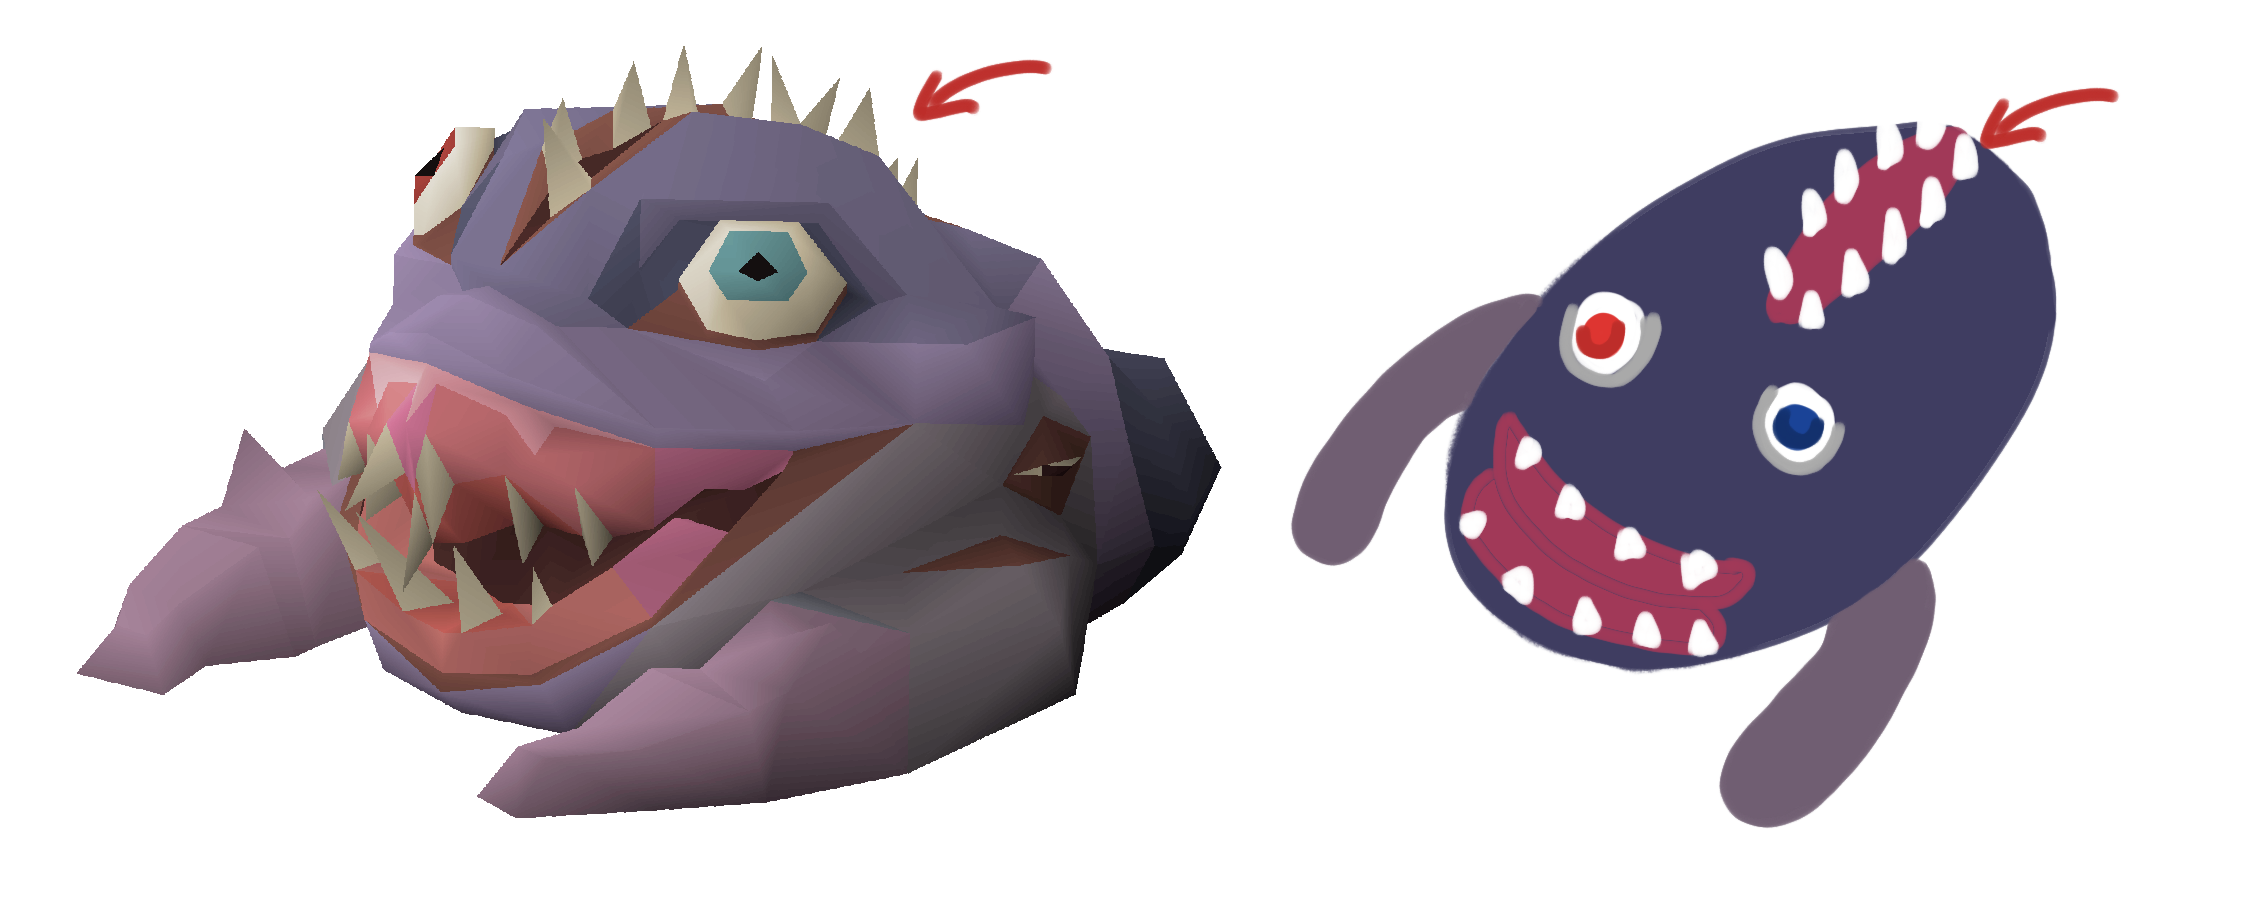
The inspiration here is a random NPC in the hunter’s guild: Orsaga - does she even have any functionality? - but the part of interest is her slippers. These are obviously based on the popular boss Duke Sucellus.
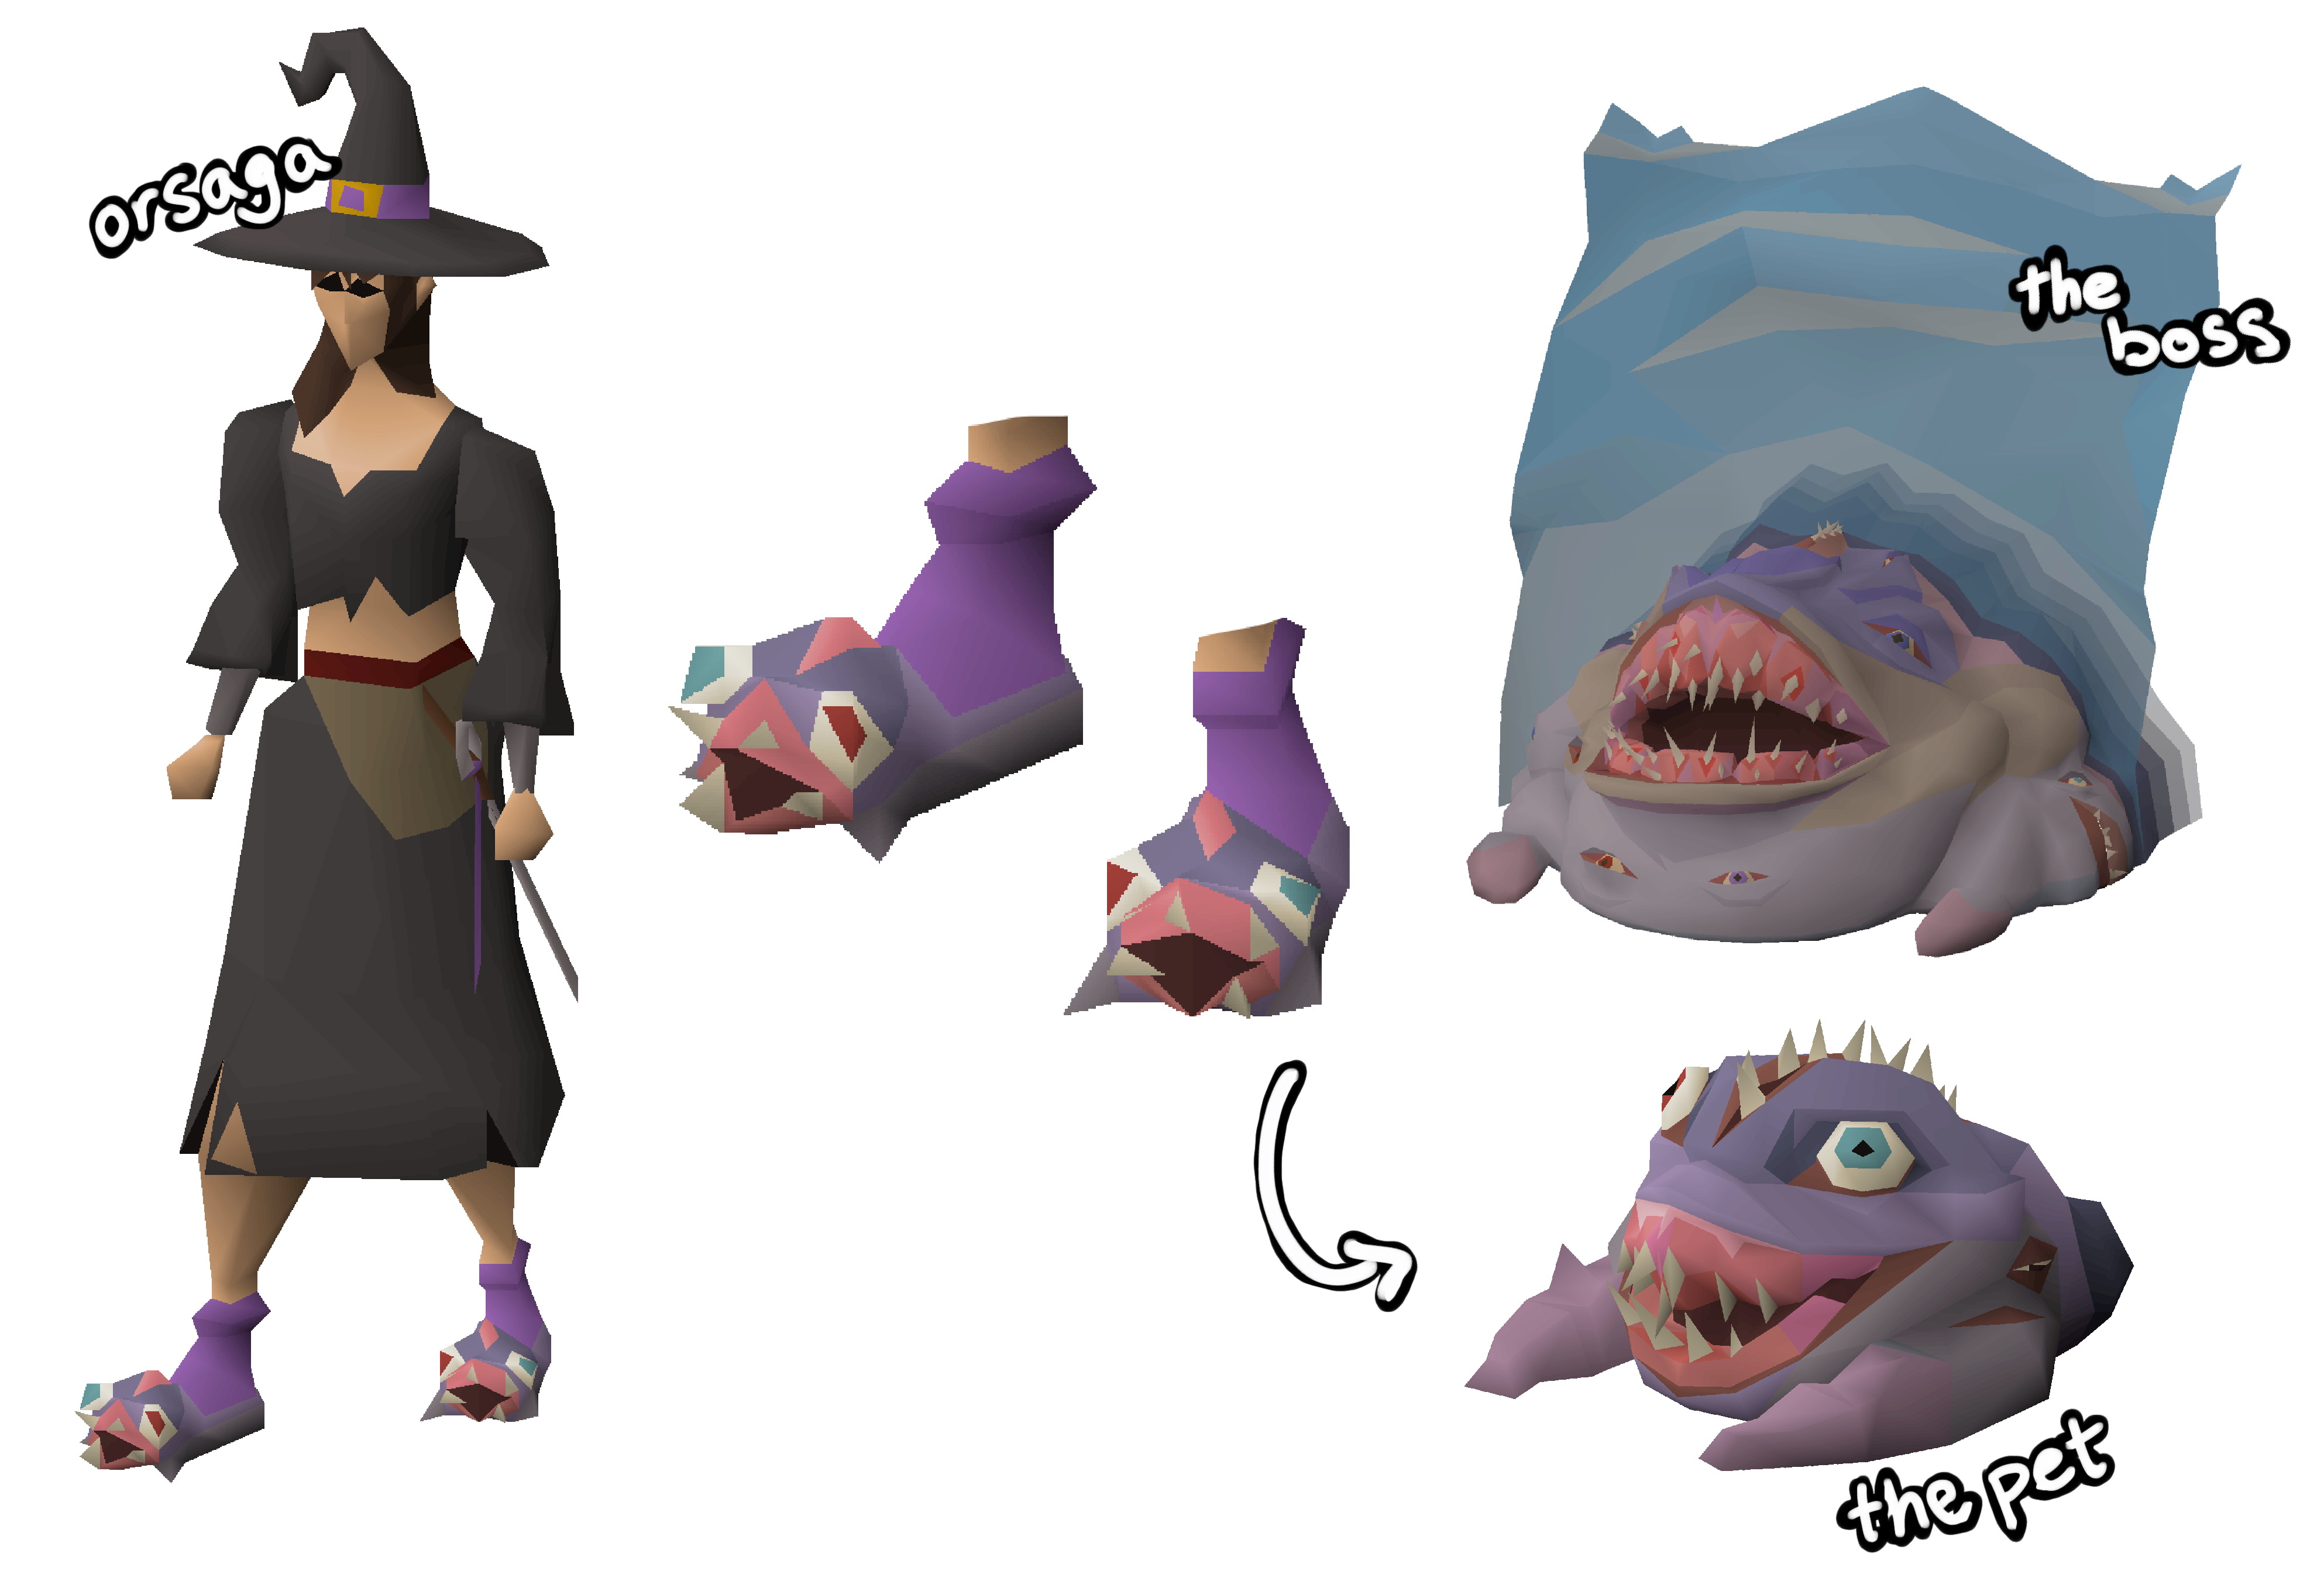
The boss image wasn’t very helpful in deciding how to recreate Duke, especially since only his front is visible. I relied very heavily on the pet image. It was the perfect reference since it was more detailed than the slippers, but simpler than the boss. I decided this would be the easiest to try and replicate with yarn.
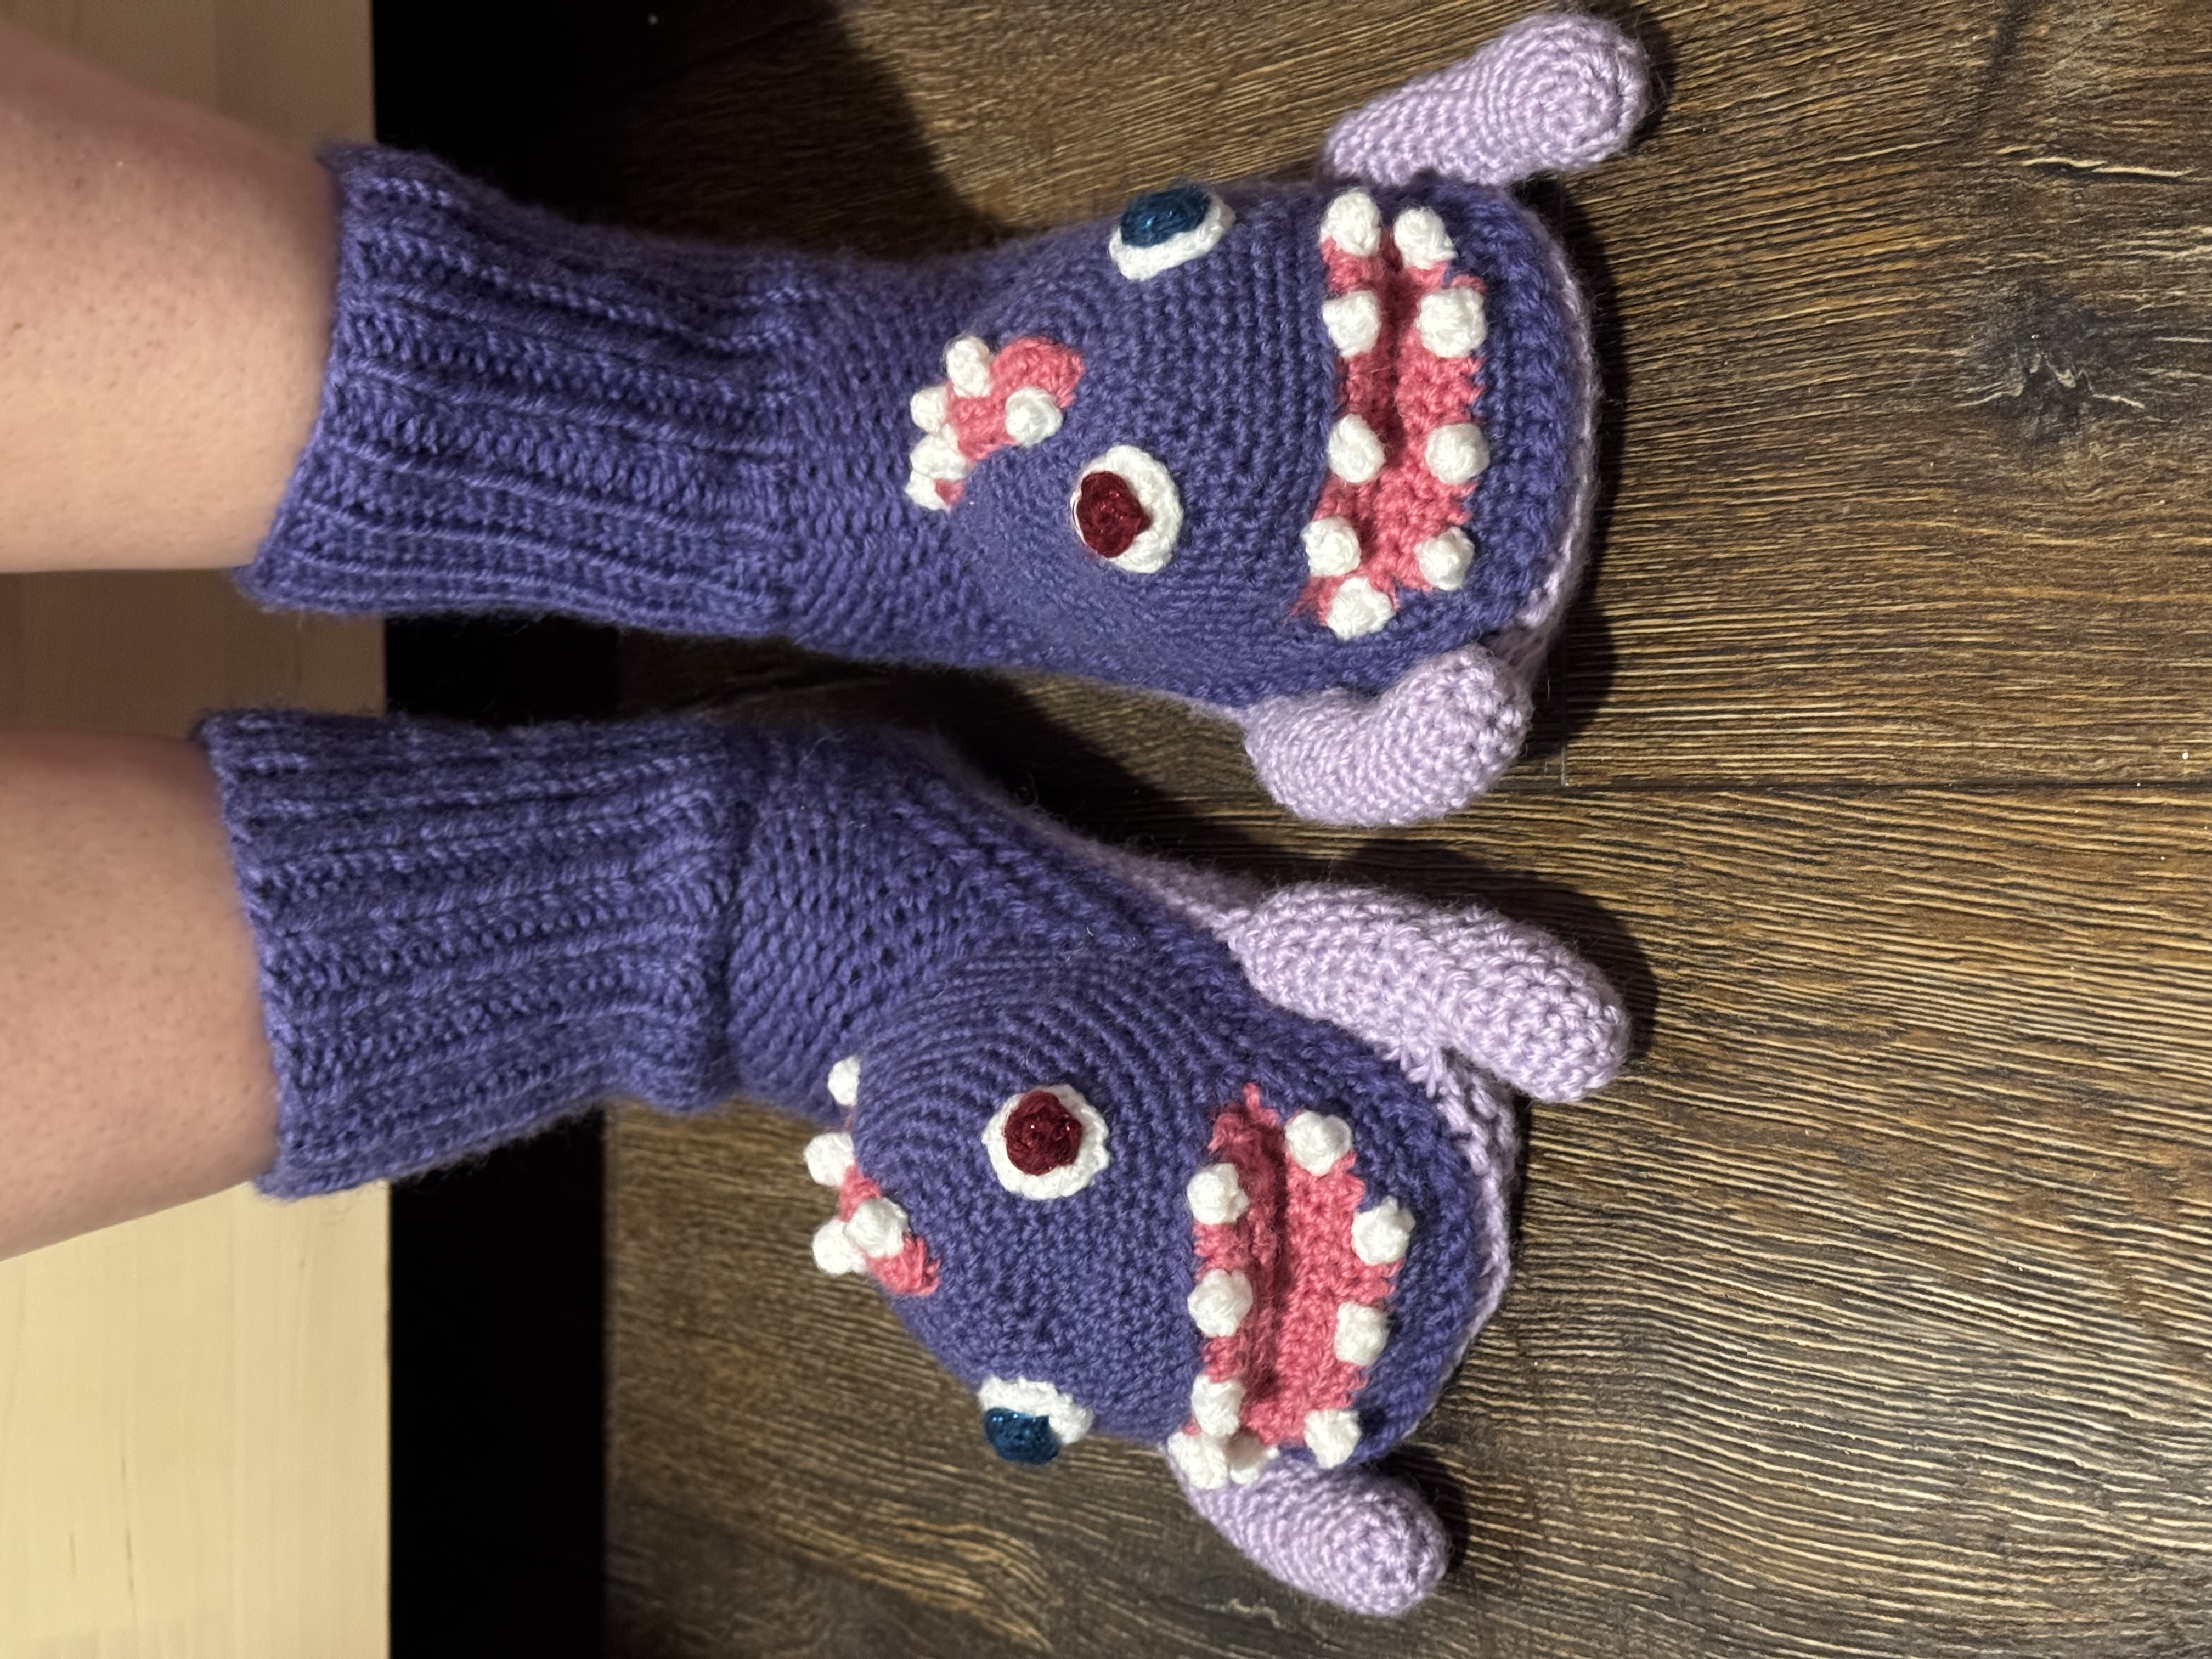
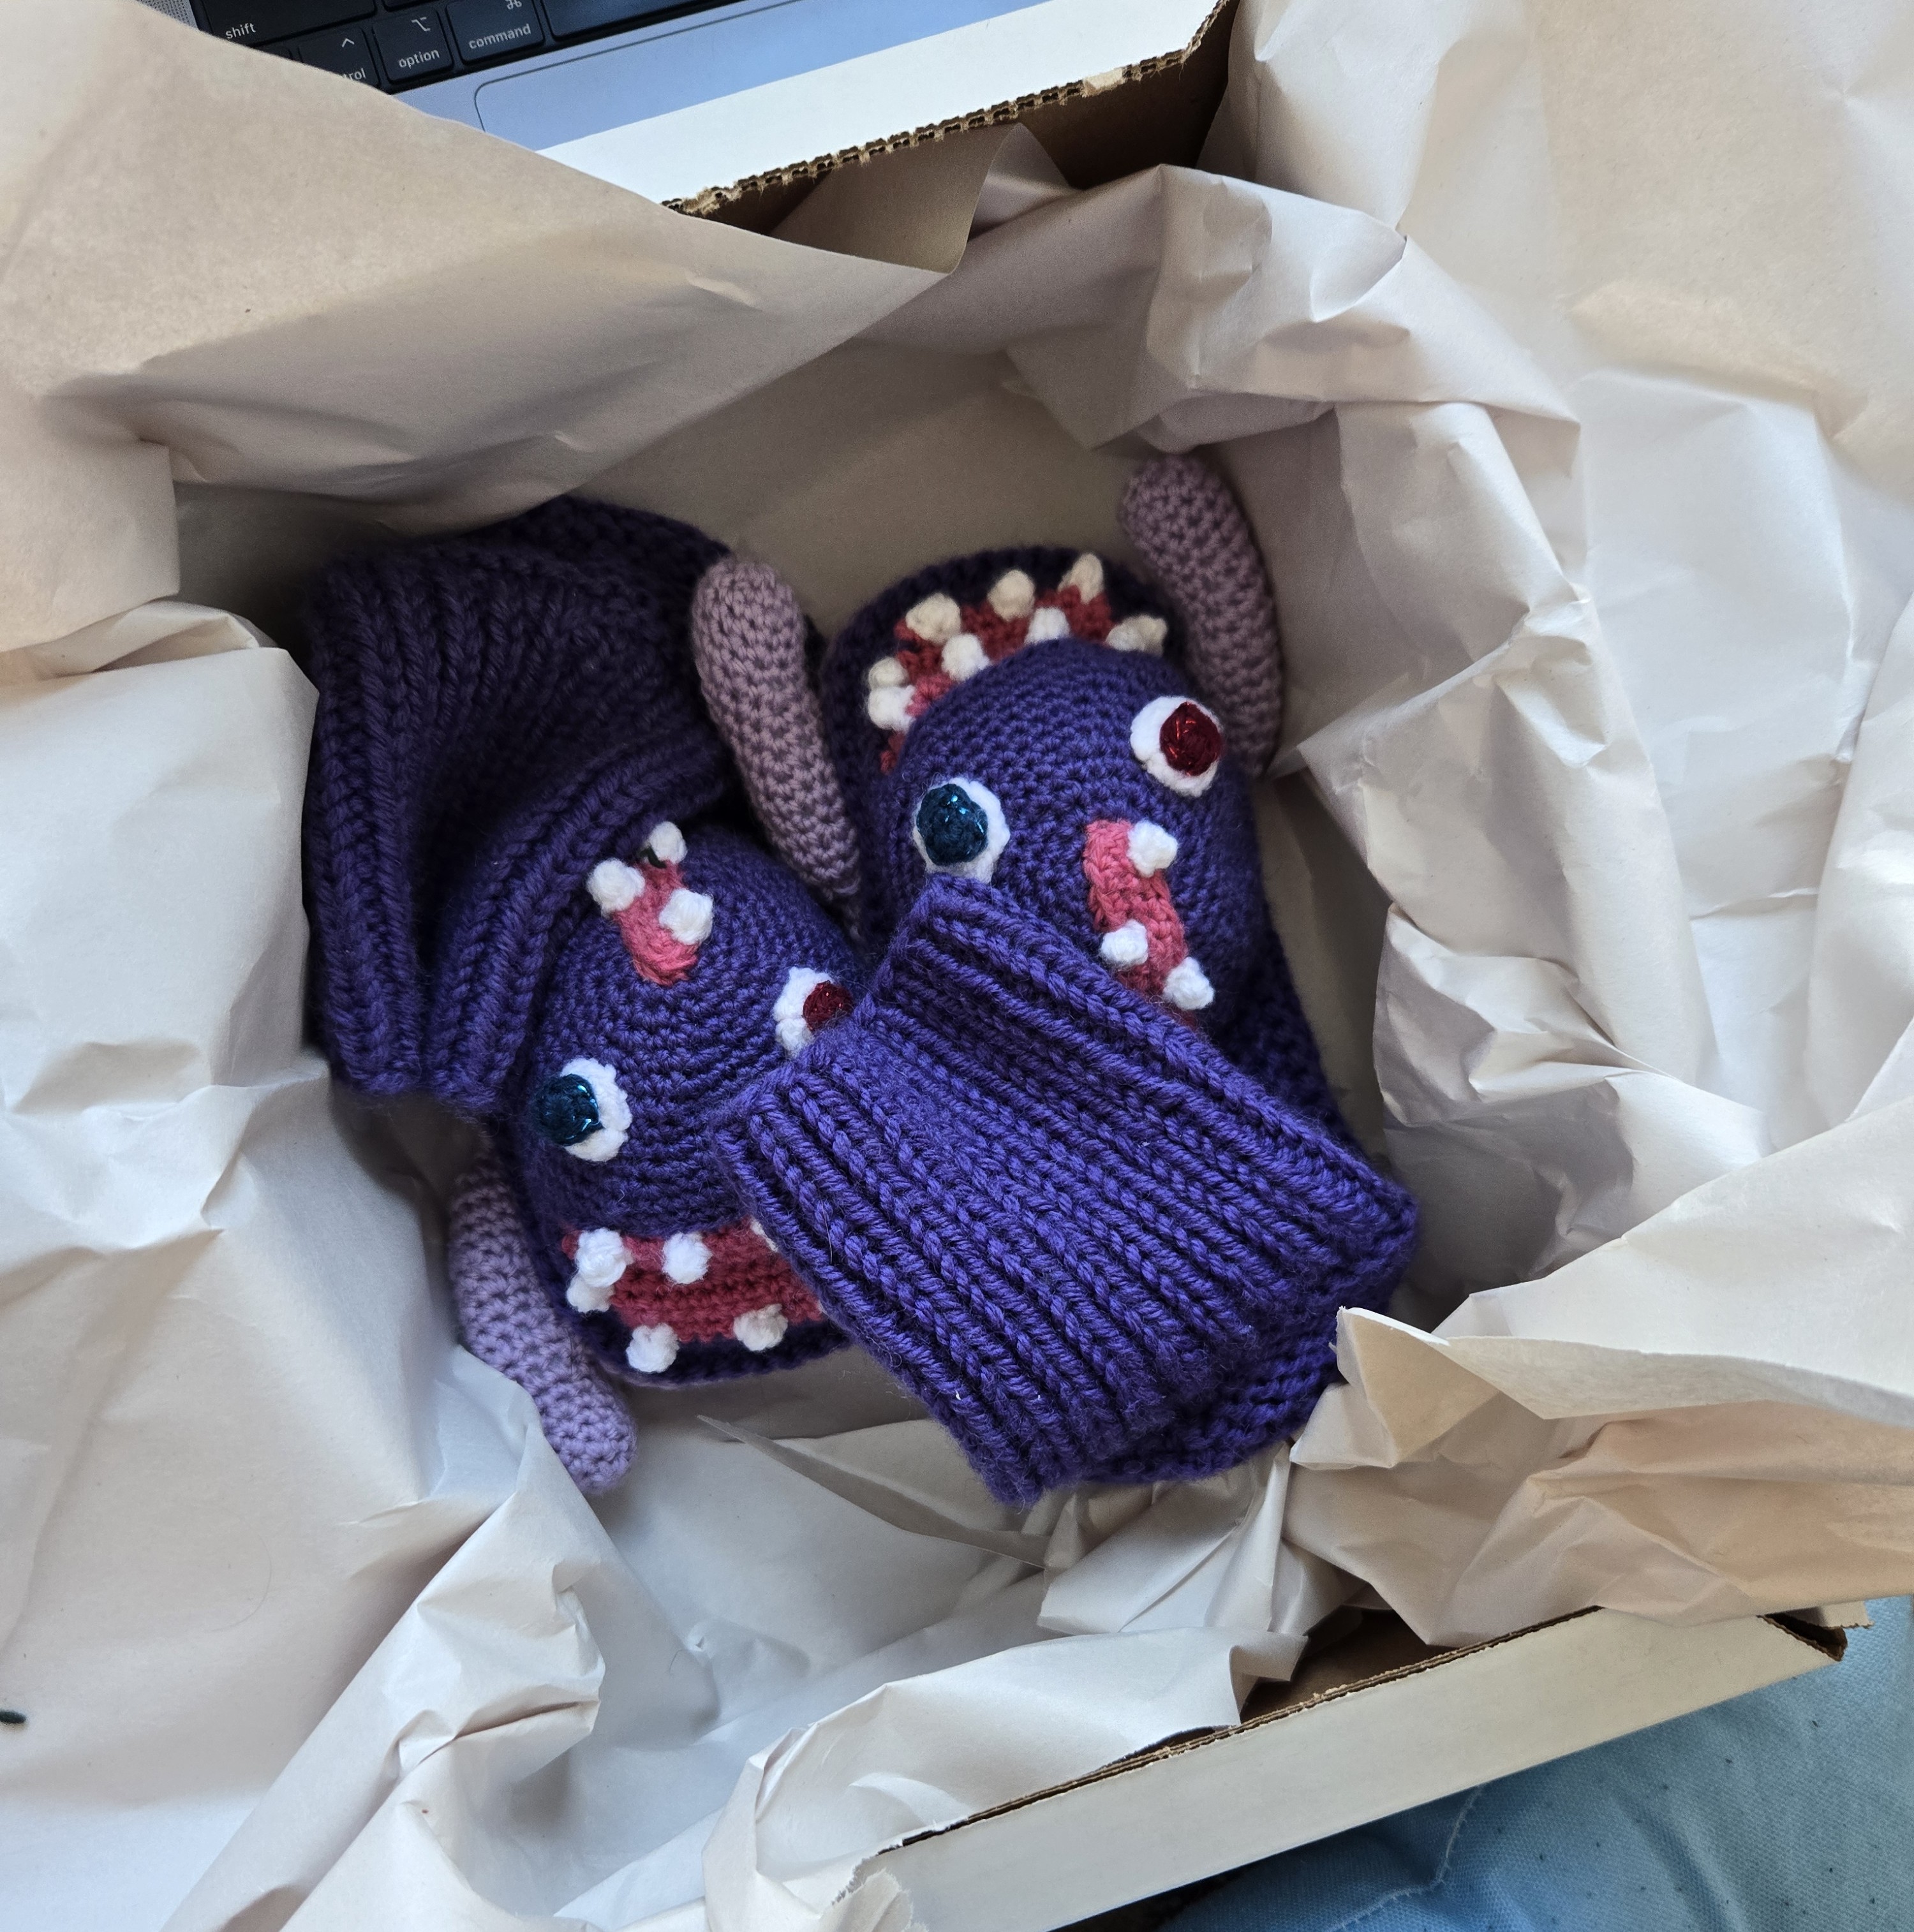
The Finished Product
I’ll go on to explain how I made them, but here are some photos of the finished product!
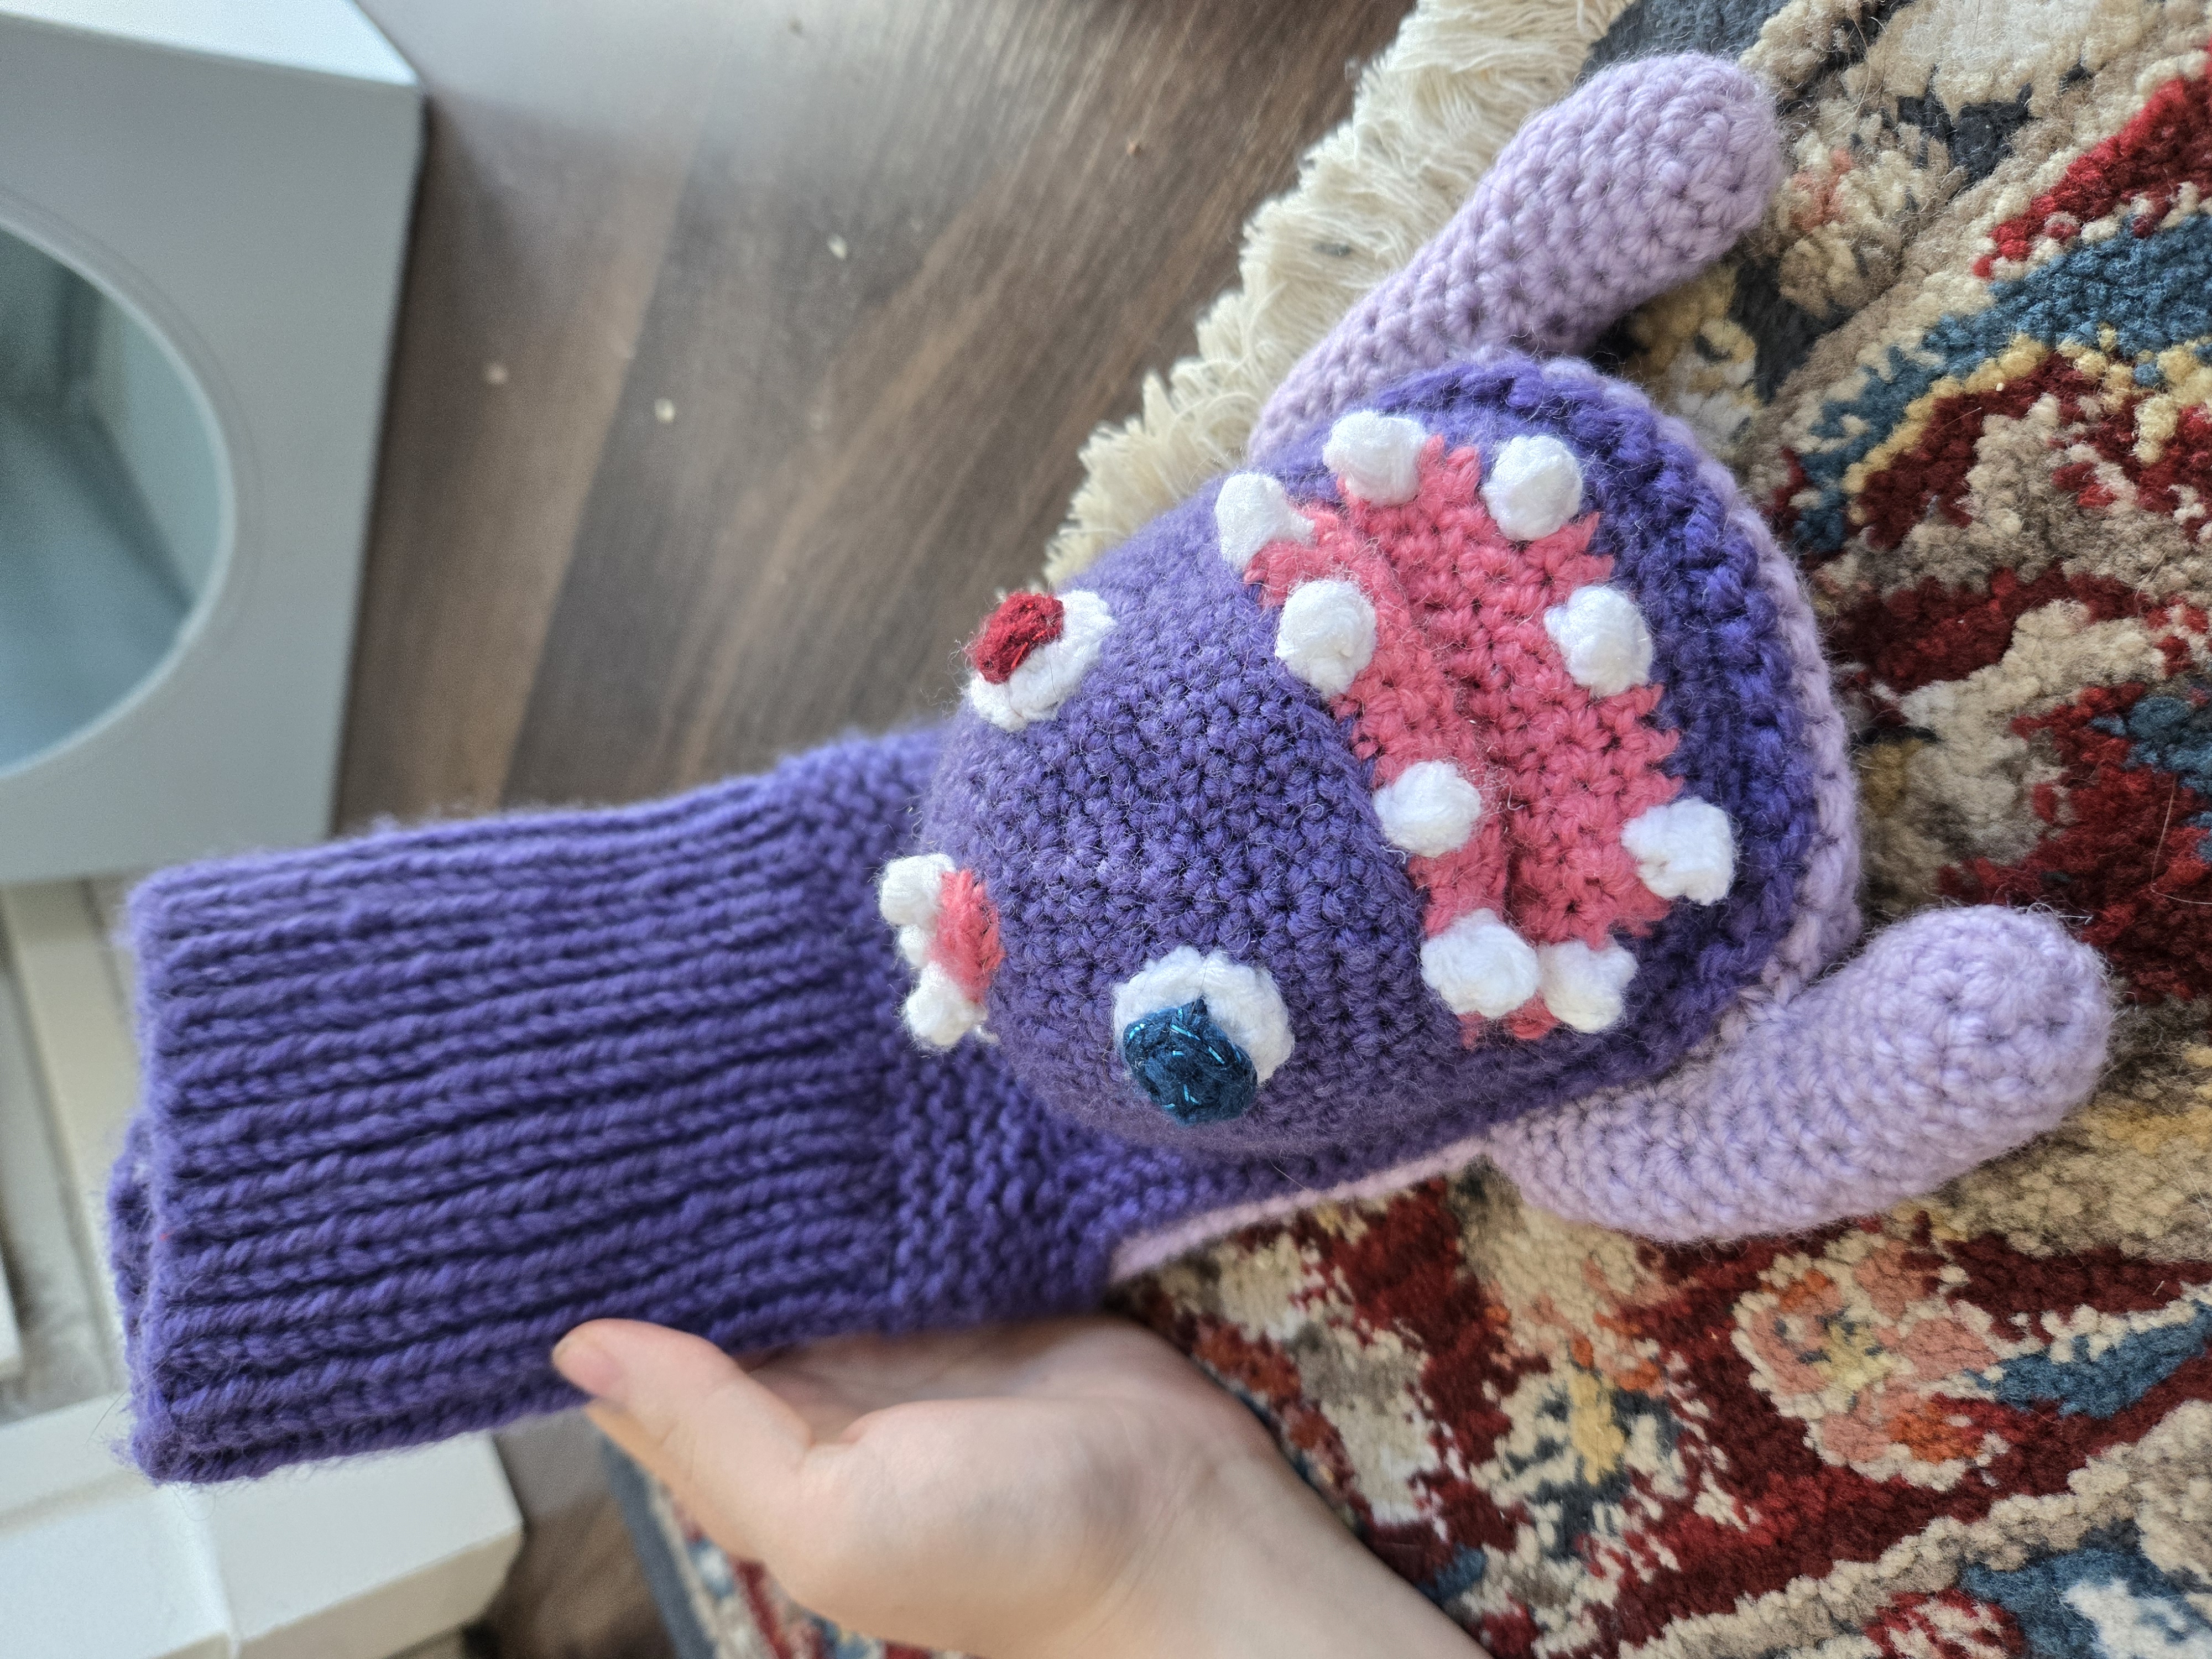
I ended up gifting them to a friend as a maxing gift, since I already have so many pairs of slippers, but they were fun to make. I’m sure a lot of people often get told “wow that’s good enough to sell!” and I’ve had some friends ask me for extra pairs, but this took me from May-September working on/off and I don’t plan to make them again.
Instructions
I would not call this a beginner friendly pattern, I recommend you find some more beginner-friendly amigurumi patterns first, or an experienced friend, as my instructions assume you already have an understanding of how to make amigurumi. I’m also way more interested in the concept of turning an idea into a pattern, than the actual delivery of the pattern itself, but I tried to clean up the instructions enough that someone could remake them if they wanted to.
I knit the slippers and crocheted the attachments because I prefer the feeling of knit garments, but you could use a crochet slipper pattern if you would prefer to only do crochet.
Materials
- Patons Classic Wool Worsted
- Dark Purple: Pansy (2 balls)
- Light Purple: Misty Lavender (1 ball)
- Pink: Rose (small amount)
- Small miscellaneous amounts of white, black, red, blue yarn
- 6mm, 6.5mm needles of various lengths (I dislike magic loop so I switch to double pointed as needed, but not required)
- 5mm crochet hook
- Stuffing
- Darning needle
The Slippers themselves
I really wanted to find a slipper pattern that had a separate construction for the base, so that I could make the “belly” of duke (the bottom of the slipper) a lighter purple.
I spent a while looking for a pattern that would work, which was a bit tricky to figure out the construction without first paying for the pattern.
At first I tried to use a crochet pattern: Space Suit pattern by 10 Hours or Less, since the Duke attachments would be crochet. I was suddenly reminded how much I hated making crochet garments; the stitches were so uncomfortable and difficult to do. I have learned now that nothing makes me more frustrated than wrapped slip stitch (just the words make me shudder). Nothing against the pattern, but it was not for me. I’ve accepted that I really only like crochet if I am doing single crochets in the round (like in amigurumi), otherwise I prefer knitting. I frogged the whole thing and decided I would rather knit the slippers, and then attach crocheted Duke amigurumi on top.
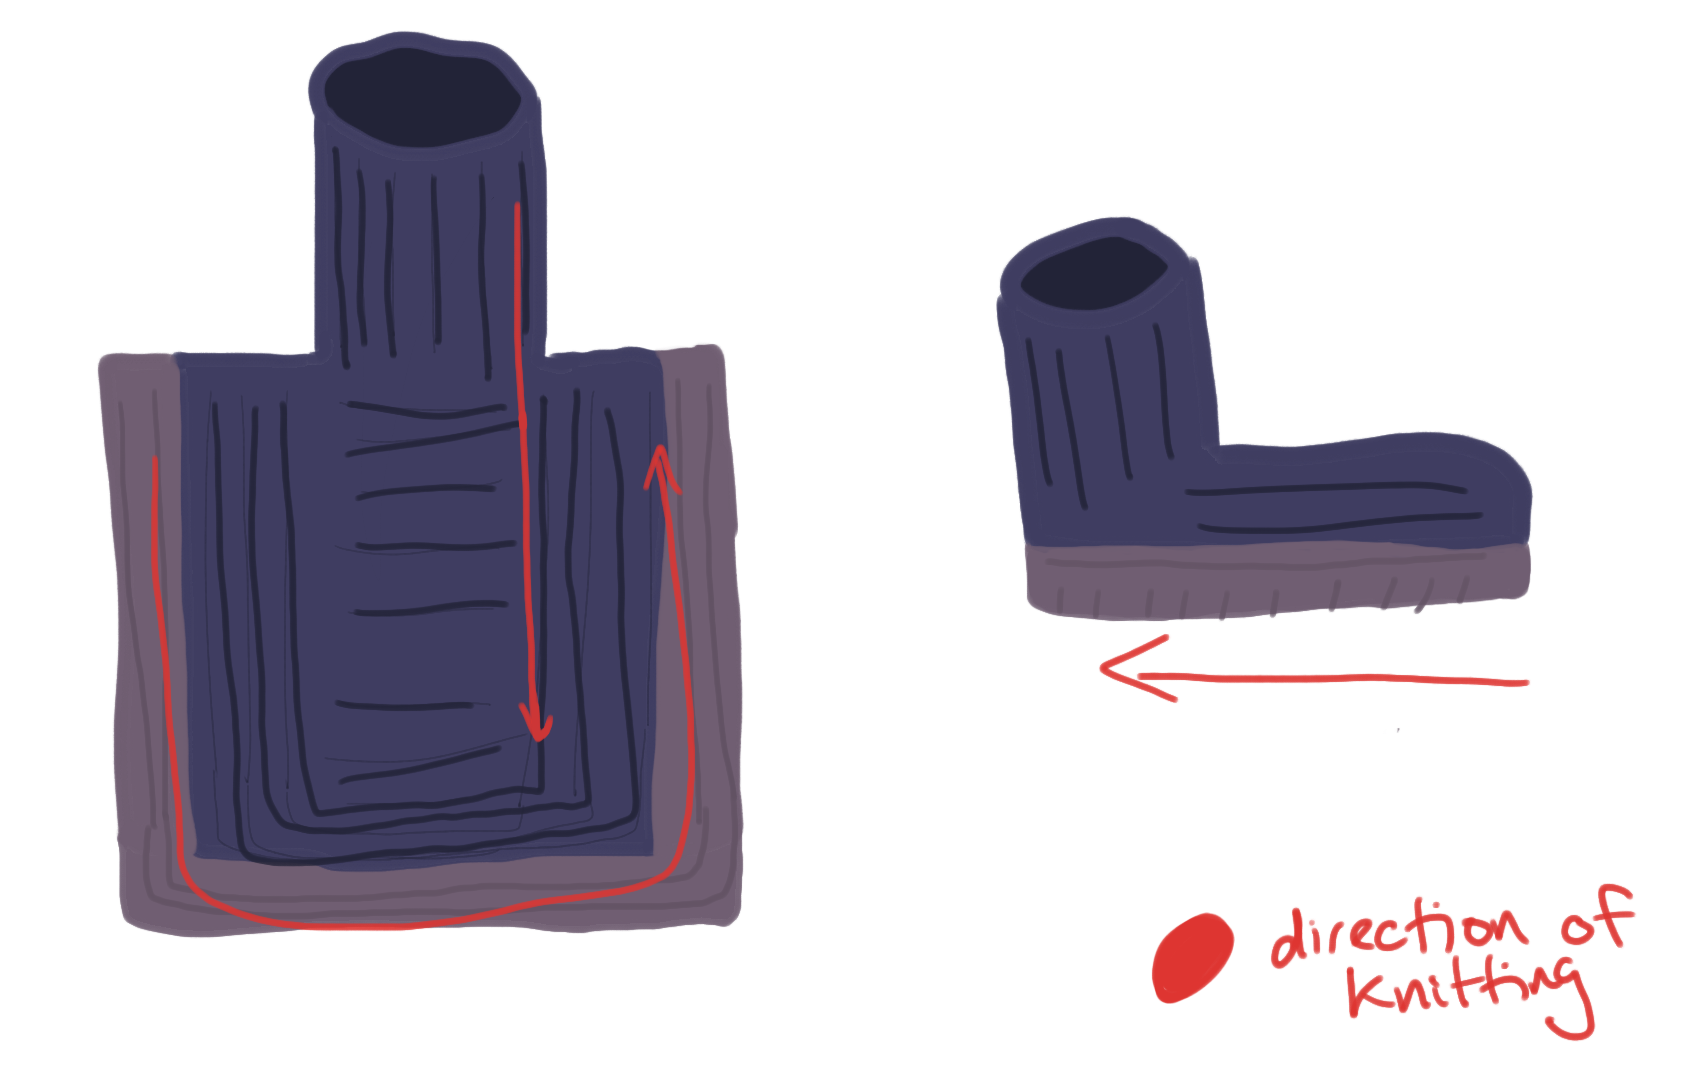
I ended up using the Cosy Slipper Socks by Debbie Bliss which had the bonus of being a free pattern so that I could look at the construction first. I was still trying to wrap my mind around the visualization of the slippers through the written pattern, when I found a video tutorial! This was perfect, it confirmed to me the pattern would work for my purpose because the entire top of the slipper is knit first flat, and then the bottom is knit along the bottom to attach the two sides.
A lot of reviews said they should’ve made the smaller size, so despite being a 9/10 US women’s shoe I made the small and it fit perfectly. (They were a bit tight for my partner with 11 US men’s shoes). I did do a couple extra rows to make sure they’d be long enough.
I actually made a decent number of alterations. I don’t want to copy/paste the pattern here (even if it is free, you should visit their website to download it as they have ads which likely bring income on the free pattern), but I will reference specific lines that won’t make sense without the context of the pattern.
My Alterations:
- I had worsted weight yarn, this was bulky. I held the yarn double.
- I knit the ribbing for the ankle in the round, I didn’t see the point of knitting it flat and sewing it up later.
- I switched to knitting flat after the instruction in the first section to
Join in A., although I kept using the same dark purple.
- I switched to knitting flat after the instruction in the first section to
- I did not do any toe shaping, this would make adding the Dukes on straight more difficult. The right and left slipper were therefore identical. (Also my big toe is not my longest toe, so it didn’t even make sense for me to do that either).
- Before the “toe shaping” section, the pattern says to knit
37(43) rows. I have long feet and wasn’t doing the toe shaping so I did46 rowstotal. - The pattern then says to pick up
20(23) ststwice. Since we don’t do toe shaping this is a different stitch count. Instead, pick up{num of rows} ÷ 2, which for me was46 ÷ 2 = 23. - When the pattern says to
place first 31(36) sts onto right-hand needle, without toe shaping this equates to{num of stitches picked up} + 11So I did23+11 = 35. Thenknit 12, turnas instructed. - After this, I skipped the rest of the “shape sole” section and just repeated the final instruction
Next row K11, k2tog, turn. [...]to finish the bottom of the slipper.
- Before the “toe shaping” section, the pattern says to knit
- I used dark purple (Pansy) for all but half-way through the sides (the “height” of the slipper), where I swapped to light purple (”Misty Lavender”)
- In the “toe shaping” section (which I didn’t do toe shaping for), there is a step
K 9 rows, this is what I’m referring to. I ended up knitting 10 rows total, 6 in dark purple and then switched to light purple for the rest of the slipper.
- In the “toe shaping” section (which I didn’t do toe shaping for), there is a step
All of this hopefully makes more sense if you have the physical half-completed object in-front of you. The slippers were quick and fun to work-up, especially the second one after I figured out the math and alterations I wanted to make.
The Dukies Themselves
At this point, I started calling the two Dukes “the Dukies” to myself. I did the following all with a 5mm (US 8) crochet hook, holding the yarn single (not double like the slippers).
Logically, I thought threw the steps as
- Make a base with mouth(s)
- Add eyes, arms
- Add teeth
Legend
- sc = single crochet
- st = stitch
- sl = slip stitch
The Head/Body
This was obviously where I started because it was the important first step. I spent a while wondering if I would actually make the “mouth on the top of the head” a cut in, but I decided to just make it an attachment I would sew on the top of the head.
This was the first image I drew to visualize what the head/mouth could look like:
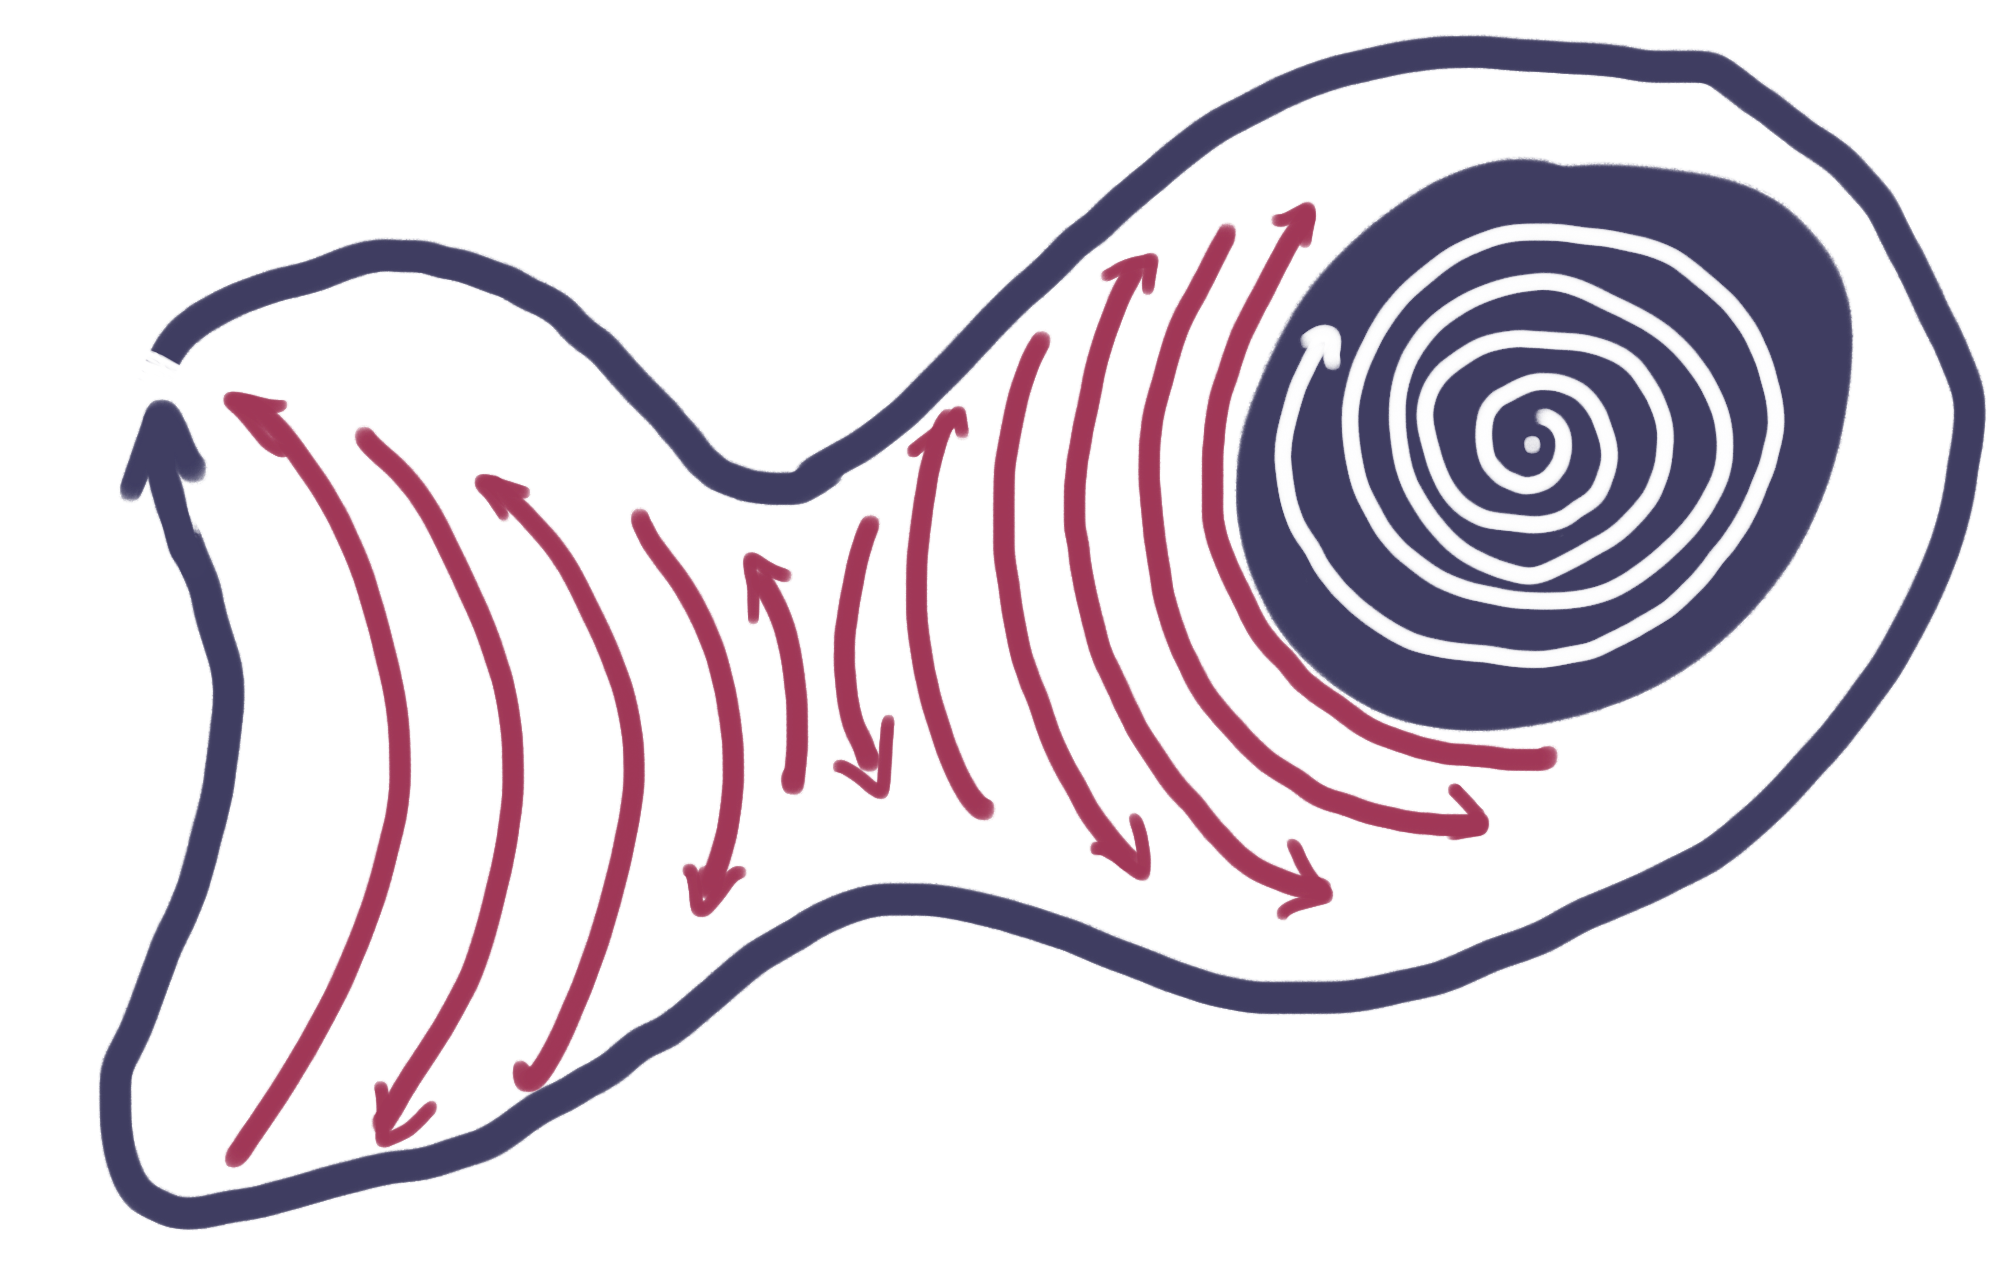
where you start crocheting in the round, then try and shape the puckering of the mouth. I put a lot of effort into thinking how the mouth would be formed, and although I did a lot of shaping I did end up just sewing it on to make sure it wouldnt flop open.
make 2
- To start: magic ring (or your preferred method) with the dark purple colour
- 6 sc in the ring (working in the round from now on)
- (2 sc in each) 6 times, 12 st
- (2 sc in one, 1 sc) 6 times, 18 sc
- (2c in one, 2 sc) 6 times, 24 sc
- (2 sc in one, 3 sc) 6 times, 30
- (2 sc in one, 4 sc) 6 times, 36
- (2 sc in one, 5 sc) 6 times, 42
- Sc all
- Sc all
- (2 sc in one, 6 sc) 6 times, 48
- (2 sc in one, 7 sc) 6 times, 54
- (2 sc in one, 8 sc) 6 times, 60
- Sc all
- Sc all
- Switch to Pink, sc 10 in pink in back loops only
- Chain 1, turn, do
10+1=11stitches: 10 sc in the previous pink sc, 1 sc in the back loop of the purple sc. (This forms the curve of the lip.) - Repeat step 17 until there are 17 pink sc (7 rows)
- Chain 1, 17 sc in front loops. (This forms the middle of the lips, which should pucker in).
- Chain 1, sc 15, sc2tog
- Repeat step 20 until 10 pink sc left (7 rows)
- Switch back to dark purple, chain 1, turn, sc 10, chain 1, then go along the side of the bottom lip (6 sc not counting corner), then around the whole head, along the other side of the bottom lip (5 sc not counting corner), chain 1
- make sure to anchor the corners of the mouth well to not leave holes: I slipped under the corner of bottom lip, then the corner of top lip, then through the head loop, then yarn over’d and pulled that through the 4 loops on hook
- Sc all
- At the corners of the mouth, sc2tog (both side) with last 2 mouth stitches. This helps form the shape of the mouth, and prevent holes.
- Sl st to next st and fasten off, leaving a long length of yarn
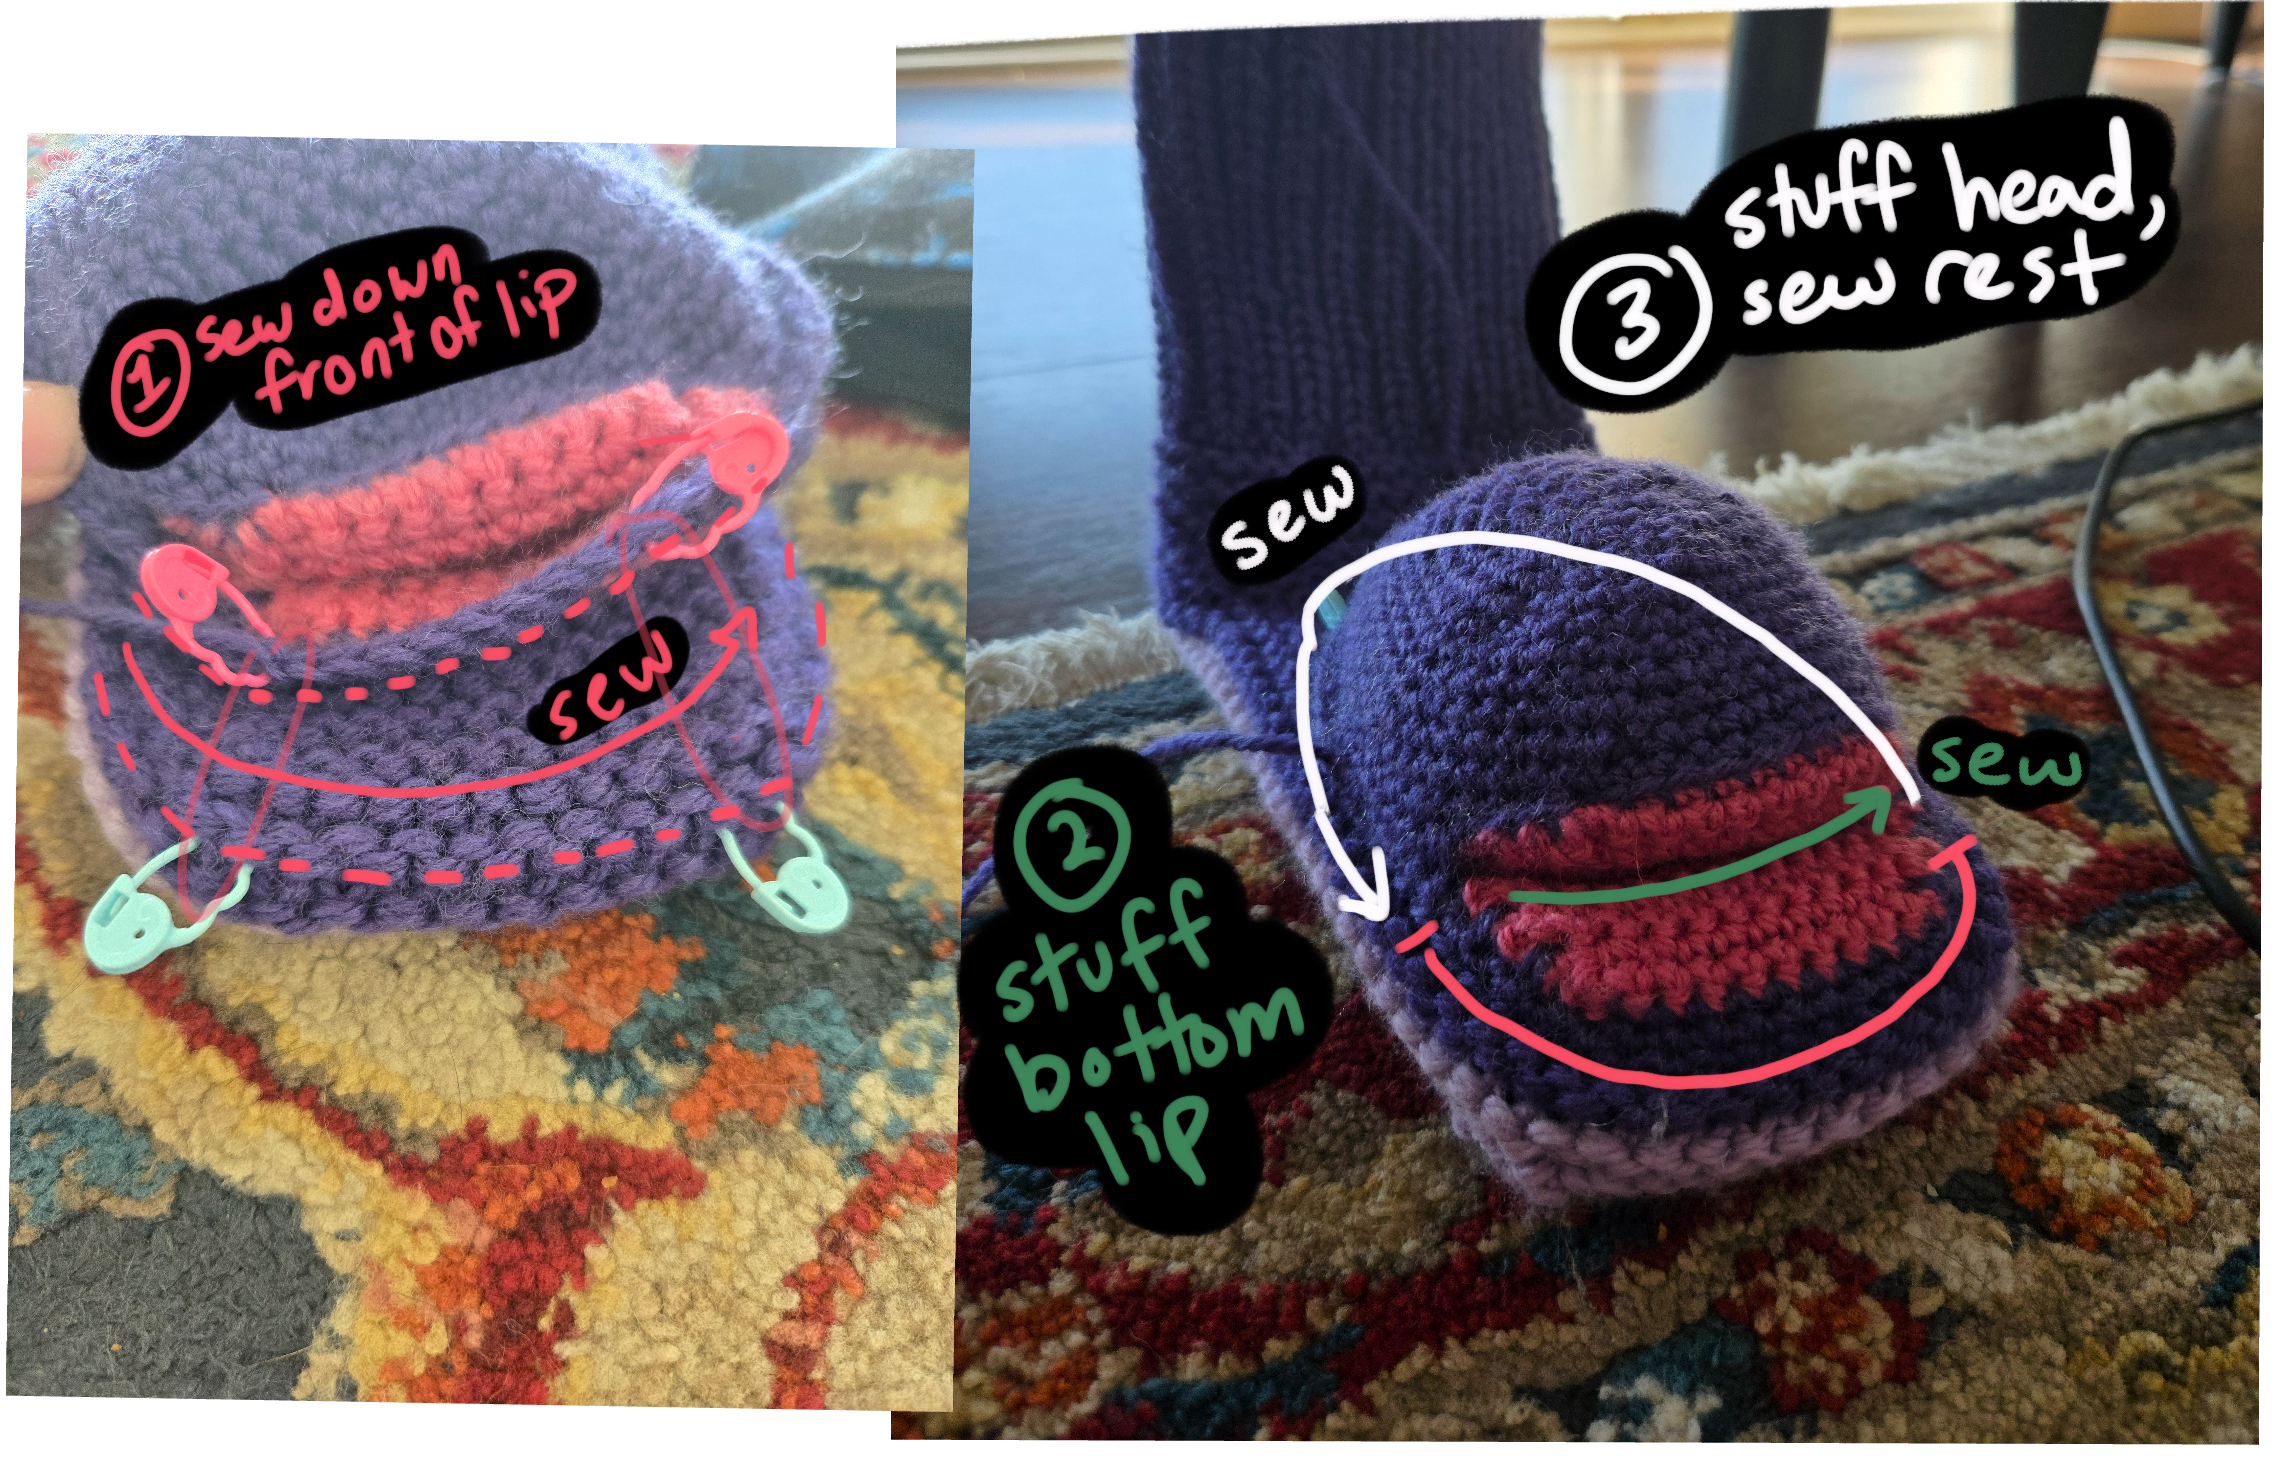
- Sew onto slipper
- I started at the front of the foot & stuffed the bottom lip & then sewed it down so the mouth wouldn’t bulge out (see image above)
- Stuff fully, finish sewing the head down to the slipper. I recommend putting it on when stuffing, to make sure the slippers are still comfortable worn and not too full (since it can stretch down).
Arms
The arms are basically just cylinders, but I added a little bit of shaping so they would curve with the front of the foot.

make 4, all in light purple
- To start: magic ring (or your preferred method)
- 6 sc in the ring (working in the round from now on)
- (2 sc in each) 6 times, 12 st
- sc all
- sc all
- sc all
- sc all
- sc2tog, sc 2, inc, sc inc , 2 sc, sc2tog, sc
- Repeat round 8 4 more times
- sc all
- sc all
- Repeat round 8
- sc all
- sc all
- sc2tog 6 times
- sc 3 (stop halfway)
- Sl st to next st and fasten off, leaving a long length of yarn
- Sew onto the side of the body, arms angling in
Eye
The eyes/iris were quite straightforward, small circles. I did the irises separate instead of just changing yarn colour to make them more 3D, since Duke’s eyes do bulge out what looks like a lot.

make 4, in white
- To start: magic ring (or your preferred method)
- 6 sc in the ring (working in the round from now on)
- (2 sc in each) 6 times, 12 st
- Sl st to next st and fasten off, leaving a long length of yarn.
- I would attach the irises first, but then sew down onto the head. I only sewed it down using the outer edge so it had a bit of a bump
Iris
make 2 red, 2 blue
- To start: magic ring (or your preferred method)
- 6 sc in the ring (working in the round from now on)
- Sl st to next st and fasten off, leaving a long length of yarn
- Sew onto the eye base
The Mouth On Top Of His Head
I’m referring to this part of the character design, which looks very much like a mouth? It does cut into the head but I decided this was too much effort, especially when the original slipper model shows it as kind of 3d.
make 2, in pink
- chain 16 turn
- 15 sc, chain 1 turn
- 15sc, 15sc down the first side of the chain
- Sl st to next st and fasten off, leaving a long length of yarn
- Sew onto the top of the head. I only sewed it down using the outer edge so it had a bit of a bump
Teeth
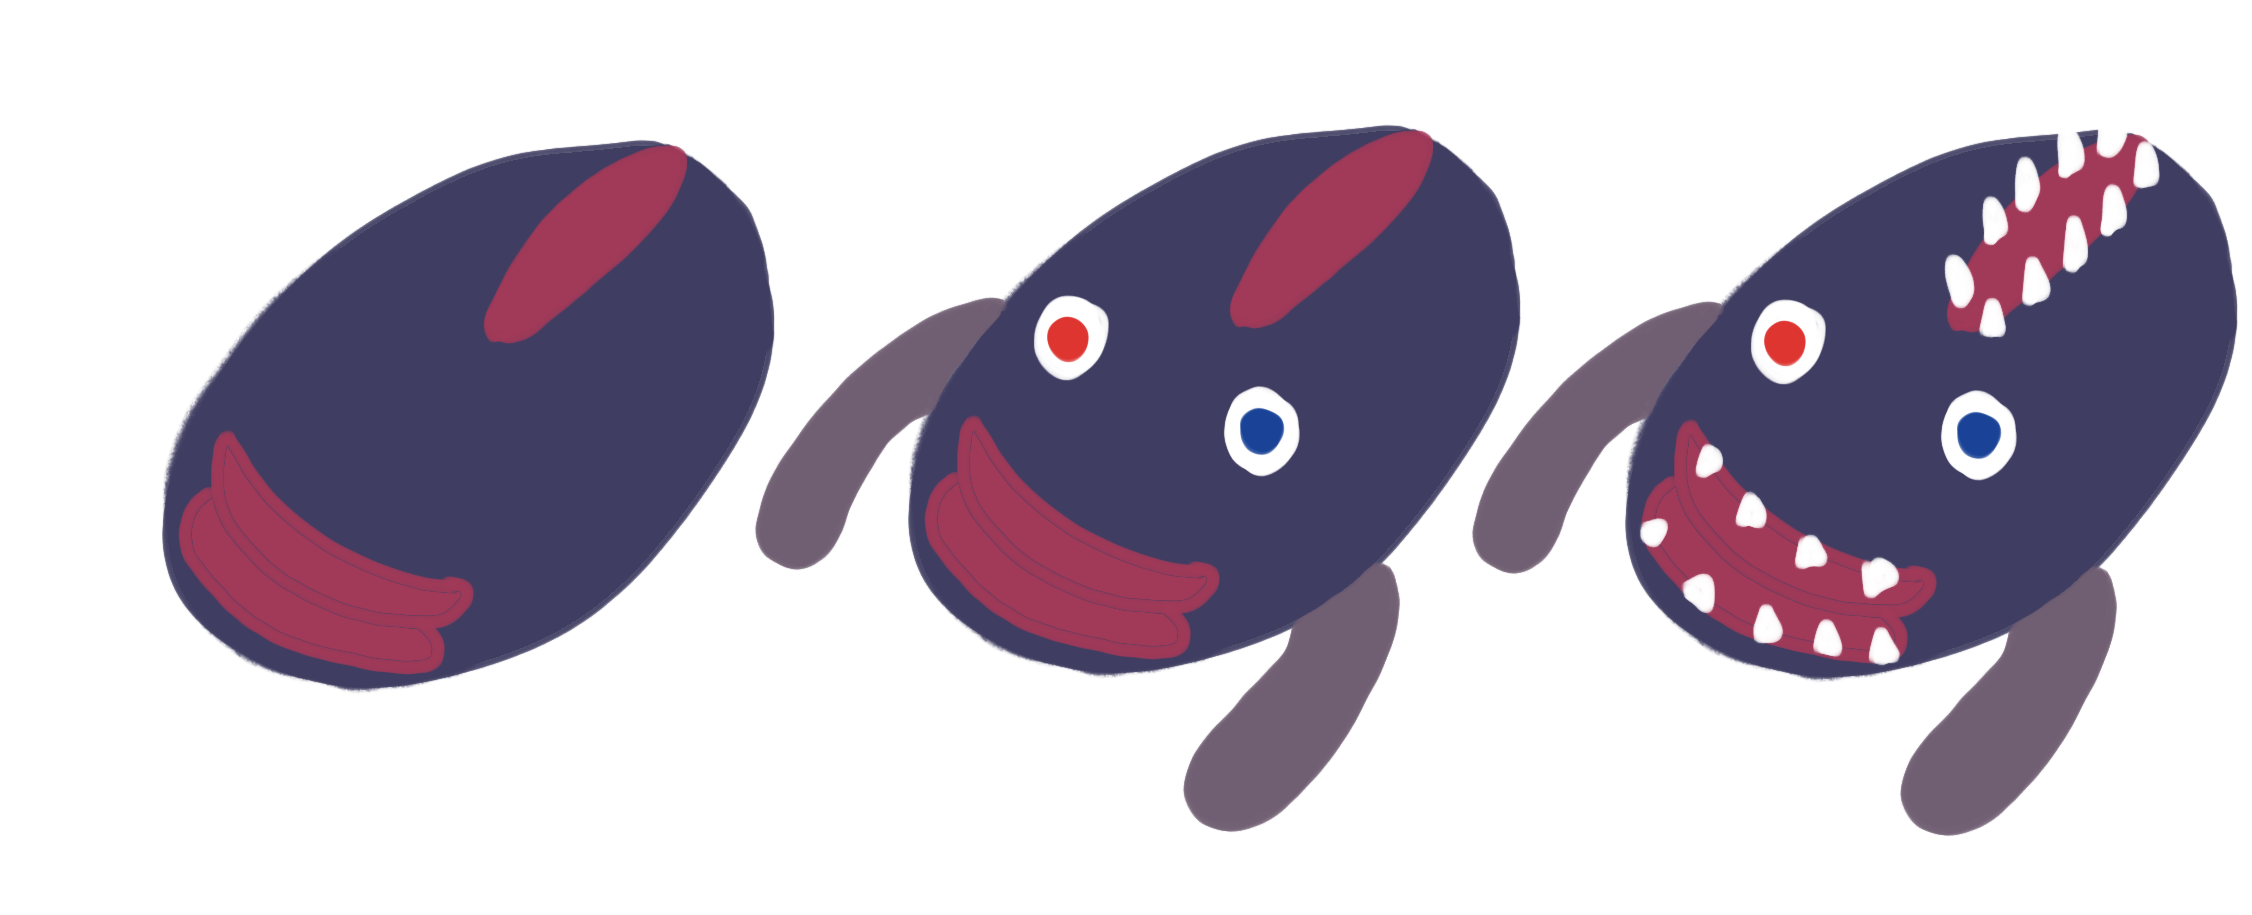
The teeth add a lot, even if they were tedious to make. They make both mouths look more like mouths, and I worked these up quick because I was so excited for it to be done. Look how much better it looked before/after teeth!
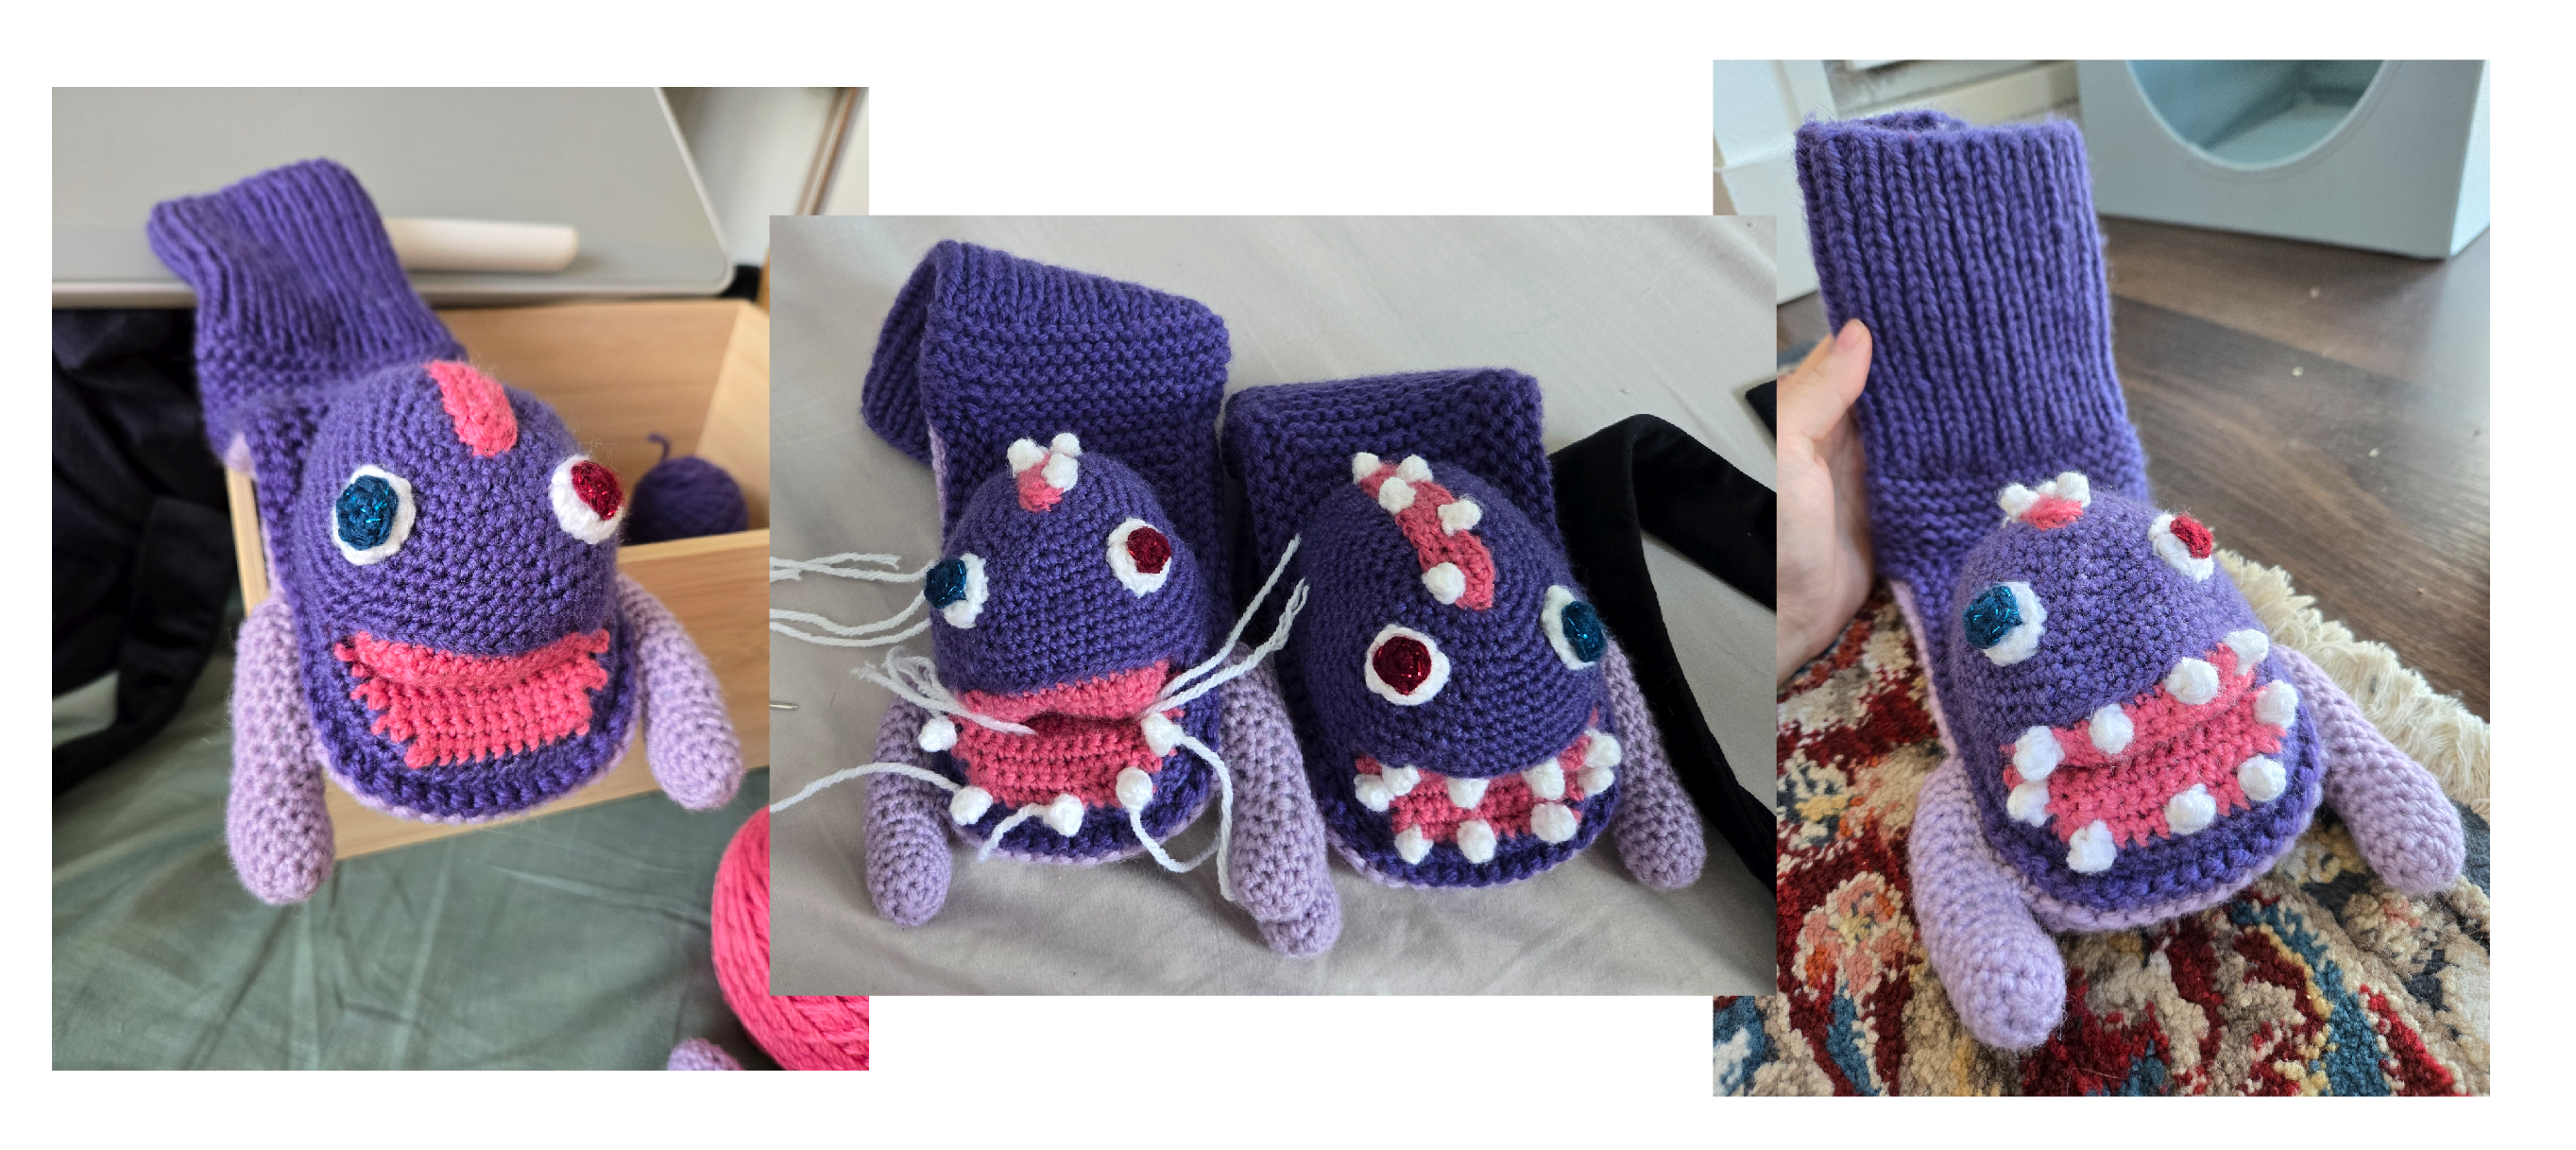
19 total, in white
4 for the top lip, 5 for the bottom lip, 5+5 for each side of The Mouth On Top Of His Head
- To start: magic ring (or your preferred method), make sure the loose end is in front of the work
- 3 sc in ring
- Sl st to next st and fasten off, leaving a long length of yarn
- Weave the 1st loose end (from the magic loop) around & back through the side to the middle, which gives the tooth a point, use it as the centre to figure out placement, use the other loose end to secure edges, tie ends together and hide in head
Bonus
Here are some bonus photos of my cats being menaces while I worked on the slippers.
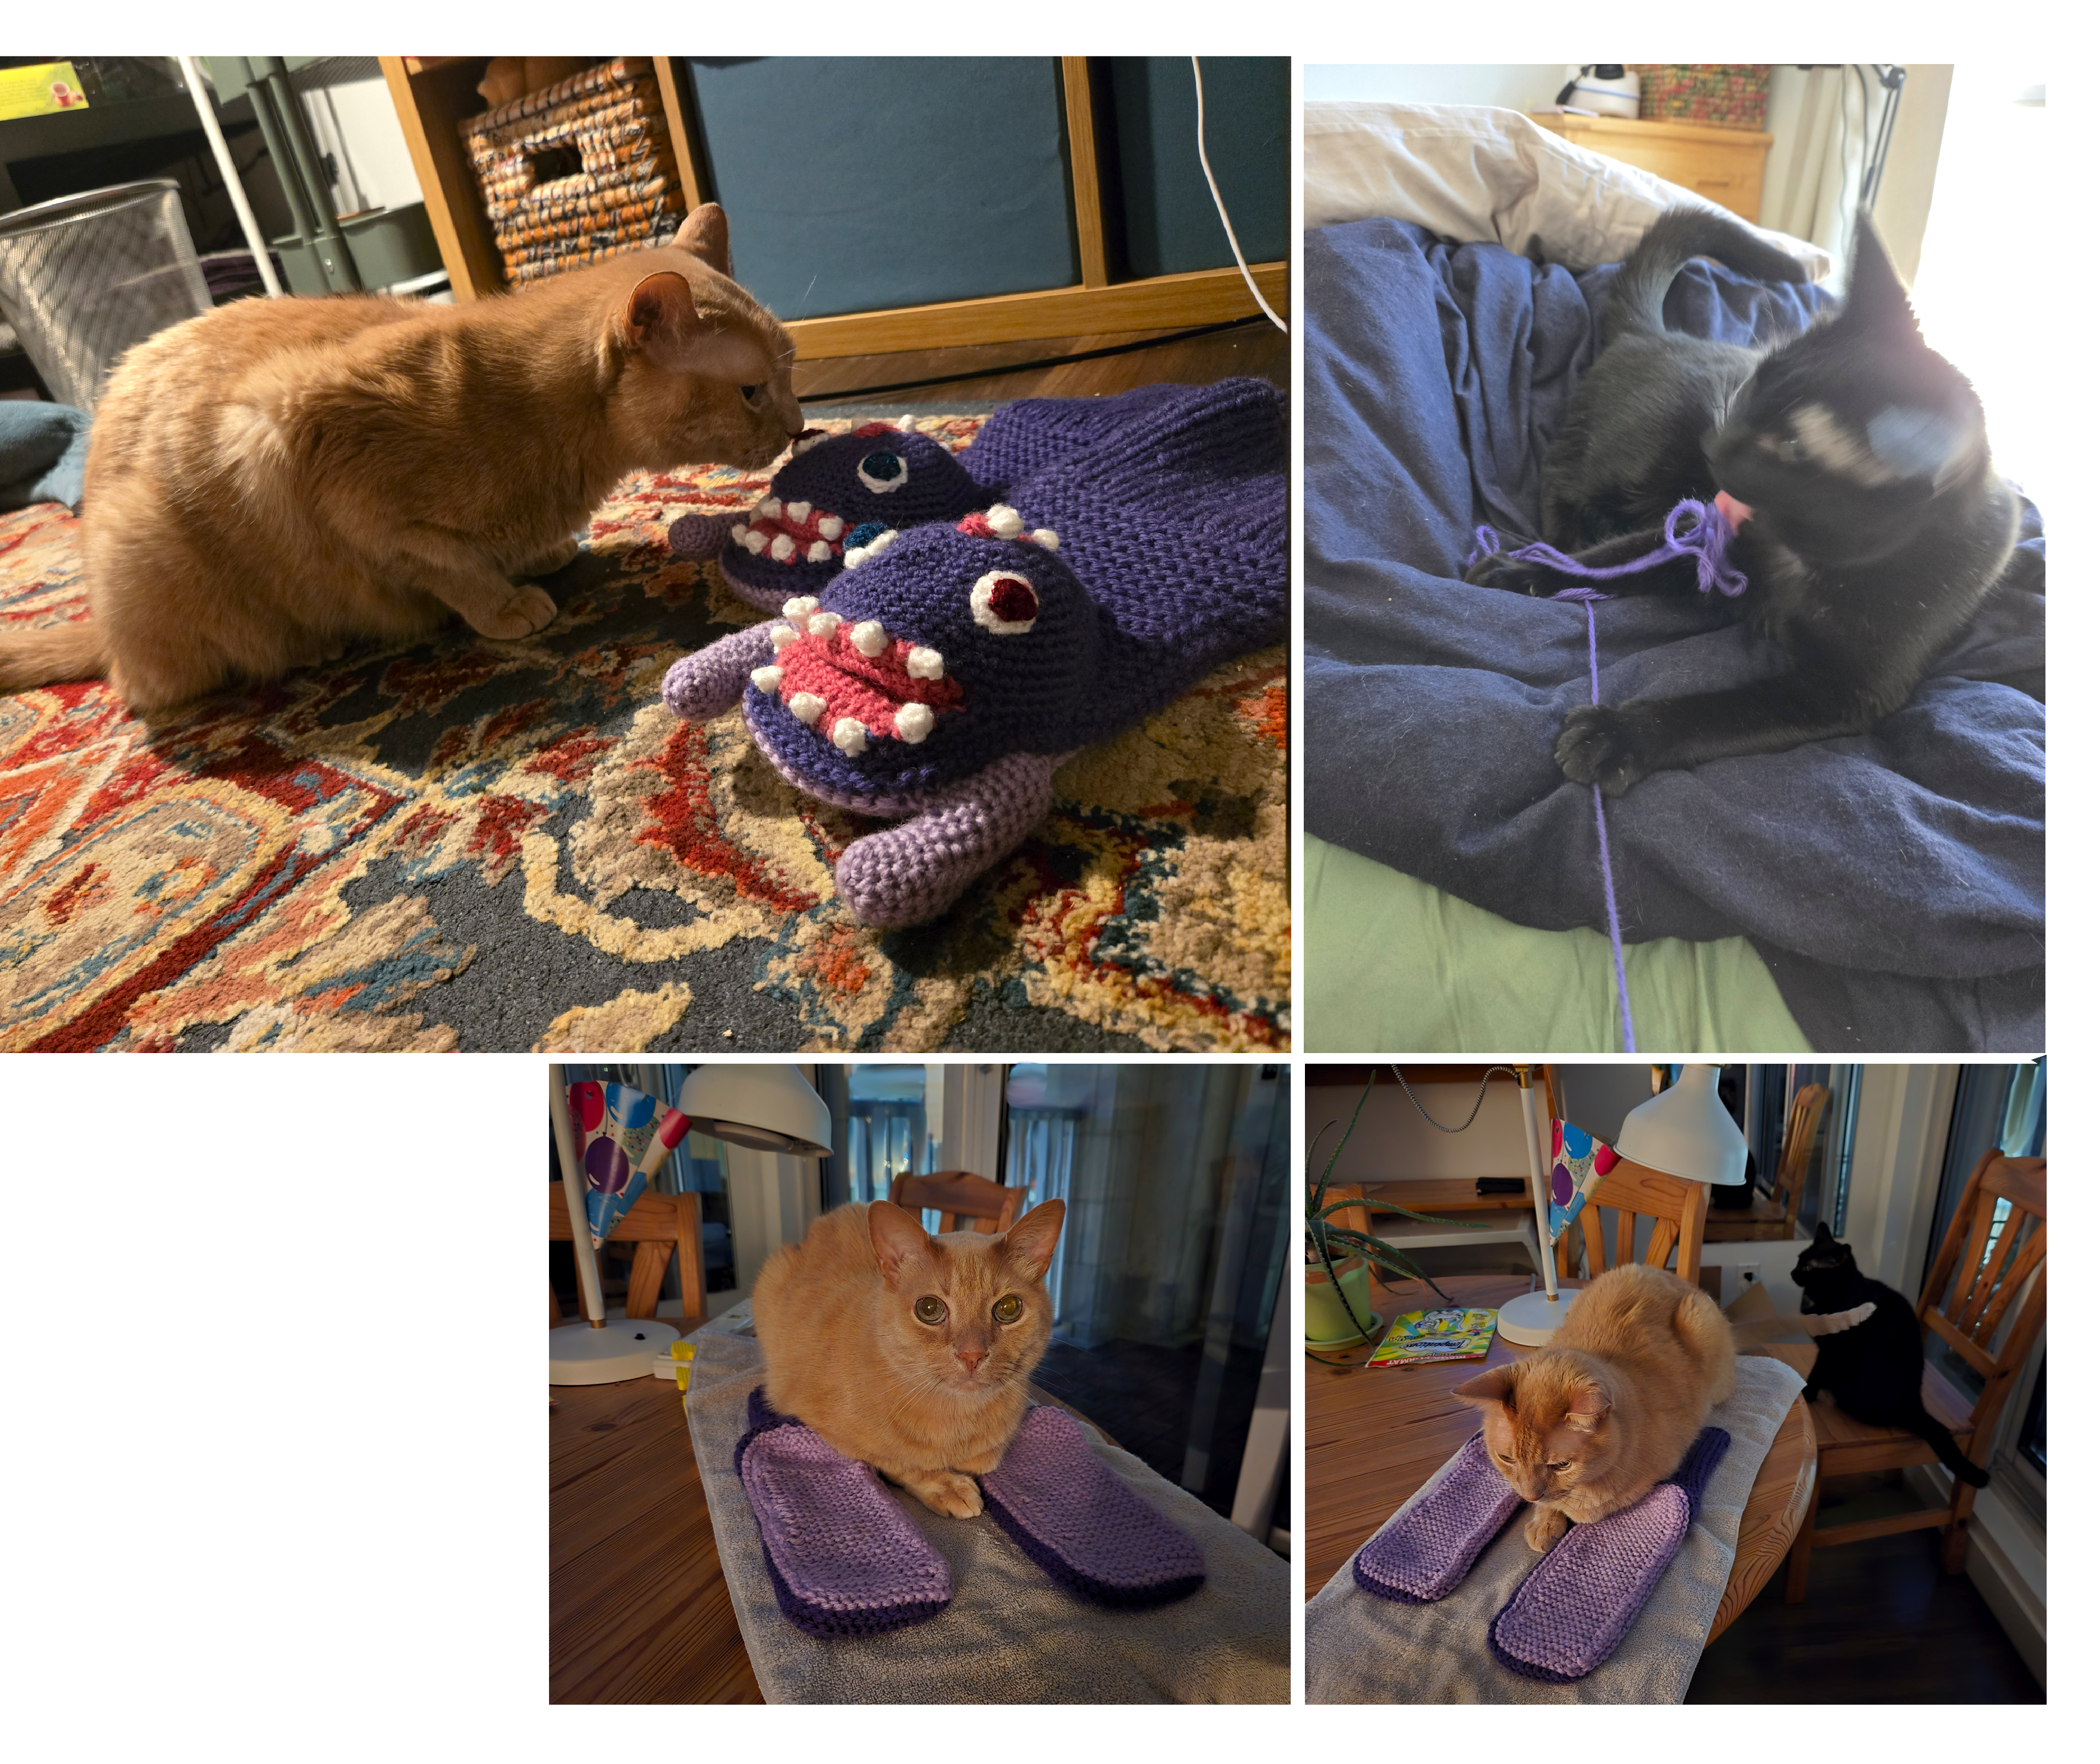
Zlatko always sits on my projects as they are drying, and Riki always likes to play with the yarn (and especially lick it!).